Showing posts with label Springboot. Show all posts

Thursday, July 13, 2023

Resolving the 'apidocumentationscanner' Error

1. How to Identify and Fix 'Error Creating Bean with Name 'Apidocumentationscanner''

The 'error creating bean with name 'apidocumentationscanner'' is typically associated with the Swagger library used in Spring projects. This error tends to appear during the bean creation process and is often due to a missing dependency in the classpath or a misconfiguration during the bean creation process.

To utilize the Swagger library effectively, it's essential to include the following dependencies in your Maven or Gradle configuration file:

<dependency>
    <groupId>io.springfox</groupId>
    <artifactId>springfox-swagger2</artifactId>
    <version>2.9.2</version>
</dependency>
<dependency>
    <groupId>io.springfox</groupId>
    <artifactId>springfox-swagger-ui</artifactId>
    <version>2.9.2</version>
</dependency>

2. How to Check and Add Missing Dependencies

Absence of necessary dependencies can lead to errors during the bean creation process. Therefore, it's crucial to incorporate these dependencies through your dependency manager. To add necessary dependencies for Maven and Gradle, refer to the following code snippets:

For Maven

<dependency>
    <groupId>io.springfox</groupId>
    <artifactId>springfox-swagger2</artifactId>
    <version>2.9.2</version>
</dependency>
<dependency>
    <groupId>io.springfox</groupId>
    <artifactId>springfox-swagger-ui</artifactId>
    <version>2.9.2</version>
</dependency>

For Gradle

implementation 'io.springfox:springfox-swagger2:2.9.2'
implementation 'io.springfox:springfox-swagger-ui:2.9.2'

After incorporating the dependencies, rebuild your project in a clean state:

For Maven

mvn clean install

For Gradle

./gradlew clean build

3. How to Verify Your Bean Creation Configuration

An incorrect Swagger configuration or unmet prerequisites can lead to the 'error creating bean with name 'apidocumentationscanner'' error. Hence, it's necessary to review the configuration related to Swagger.

Your Swagger configuration class should include @Configuration, @EnableSwagger2, and @Bean annotations. Refer to the following example of a properly configured class:

@Configuration
@EnableSwagger2
public class SwaggerConfig {

  @Bean
  public Docket apiDocket() {
    return new Docket(DocumentationType.SWAGGER_2)
          .select()
          .apis(RequestHandlerSelectors.any())
          .paths(PathSelectors.any())
          .build();
  }
}

In addition, conflicts between Spring and Swagger configurations can lead to errors. Therefore, confirm that the Spring boot-related configurations are accurately written.

Ensure the Swagger-related properties are correctly set in the application.yml or application.properties file. Add any missing properties, if required:

swagger:
  enabled: true
  base-package: com.example.mypackage
  paths:
    - /api/.*

4. Conclusion: Step-by-step Guide to Resolving the Error

The 'error creating bean with name 'apidocumentationscanner'' error can mainly be attributed to incorrect Swagger configurations or dependency issues. To fix the error, follow these steps:

  1. Ensure necessary dependencies are added. If you're using Maven or Gradle, incorporate the required libraries through your dependency management tool.
  2. Rebuild and run the project to check if the error has been resolved.
  3. Confirm the @Configuration, @EnableSwagger2, and @Bean annotations are correctly used in the Swagger configuration class.
  4. Depending on the project requirements, verify if the Swagger-related properties are set in the project configuration file.

Following the steps above will help you identify and fix the root cause of the 'error creating bean with name 'apidocumentationscanner'' error. After resolving the error, rebuild and run the project again to ensure it's functioning as expected.

'apidocumentationscanner'のエラーを解決する方法

1. エラーの原因と対応策

'error creating bean with name 'apidocumentationscanner''は、Springプロジェクトで使用されるSwaggerライブラリに関連した問題で、主にBean作成プロセス中に発生します。このエラーの原因は、クラスパス内の依存関係が欠けているか、Bean作成設定の問題に起因することが多いです。

2. 依存関係の確認と追加

Swaggerライブラリを使用するためには、以下の依存関係をMavenまたはGradleの構成ファイルに含める必要があります。これが正しく設定されているかどうかを確認してください。依存関係が欠けている場合、Beanの作成中にエラーが発生する可能性があります。

Maven

<dependency>
    <groupId>io.springfox</groupId>
    <artifactId>springfox-swagger2</artifactId>
    <version>2.9.2</version>
</dependency>
<dependency>
    <groupId>io.springfox</groupId>
    <artifactId>springfox-swagger-ui</artifactId>
    <version>2.9.2</version>
</dependency>

Gradle

implementation 'io.springfox:springfox-swagger2:2.9.2'
implementation 'io.springfox:springfox-swagger-ui:2.9.2'

依存関係を追加した後、プロジェクトをクリーンして再ビルドすることを忘れないでください。

Maven

mvn clean install

Gradle

./gradlew clean build

3. Swagger設定の確認

Swaggerの設定が不適切であったり、条件が満たされていない場合、「error creating bean with name 'apidocumentationscanner''」エラーが発生する可能性があります。Swaggerに関する設定を確認し、必要に応じて修正してみてください。

@Configuration
@EnableSwagger2
public class SwaggerConfig {

  @Bean
  public Docket apiDocket() {
    return new Docket(DocumentationType.SWAGGER_2)
          .select()
          .apis(RequestHandlerSelectors.any())
          .paths(PathSelectors.any())
          .build();
  }
}

さらに、SwaggerとSpringの設定間で競合が生じた場合もエラーが発生する可能性があります。そのため、Spring Boot関連の設定が正しく記述されているか、再確認してみてください。

swagger:
  enabled: true
  base-package: com.example.mypackage
  paths:
    - /api/.*

4. エラー解決の手順と結論

'error creating bean with name 'apidocumentationscanner''エラーは、主にSwaggerの設定不備や依存関係の問題が原因で発生します。以下の手順に従ってエラー解決を試みてみてください。

  1. 必要な依存関係が追加されているかを確認します。
  2. プロジェクトを再ビルドして実行し、エラーが解消されたかを確認します。
  3. Swagger設定クラスで@Configuration, @EnableSwagger2, @Beanアノテーションが正しく使用されているかを確認します。
  4. 条件によっては、プロジェクト設定ファイルでSwagger関連のプロパティが設定されているかを確認します。

上記の手順を順番に確認し、'error creating bean with name 'apidocumentationscanner''エラーの原因を特定し、修正することでエラーを解決できます。エラーが解消されたら、プロジェクトを再ビルドして実行し、正常に動作することを確認してください。

'apidocumentationscanner' 오류 해결하기

1. 'apidocumentationscanner' 빈 생성 오류 분석

Spring 프로젝트에서 'error creating bean with name 'apidocumentationscanner''라는 오류가 발생하면 주로 Swagger 라이브러리와 관련된 문제일 가능성이 높습니다. 이 오류는 빈(bean) 생성 과정에서 주로 발생하며, 클래스 경로(classpath)에 필요한 의존성이 누락되어 있는 경우나 빈 생성 설정에 문제가 있을 때 발생합니다.

<dependency>
    <groupId>io.springfox</groupId>
    <artifactId>springfox-swagger2</artifactId>
    <version>2.9.2</version>
</dependency>
<dependency>
    <groupId>io.springfox</groupId>
    <artifactId>springfox-swagger-ui</artifactId>
    <version>2.9.2</version>
</dependency>

Swagger 라이브러리를 사용하기 위해서는 Maven 또는 Gradle 설정 파일에 이 의존성들을 추가해야 합니다. 설정이 올바르게 이루어졌는지 확인해보세요.

2. 의존성 누락 확인 및 해결

빈 생성 과정에서 필요한 의존성이 누락되면 오류가 발생할 수 있습니다. 따라서 의존성 관리 도구를 통해 필요한 의존성을 추가하도록 합니다. Maven과 Gradle의 경우 아래와 같은 코드로 의존성을 추가할 수 있습니다.

Maven

<dependency>
    <groupId>io.springfox</groupId>
    <artifactId>springfox-swagger2</artifactId>
    <version>2.9.2</version>
</dependency>
<dependency>
    <groupId>io.springfox</groupId>
    <artifactId>springfox-swagger-ui</artifactId>
    <version>2.9.2</version>
</dependency>

Gradle

implementation 'io.springfox:springfox-swagger2:2.9.2'
implementation 'io.springfox:springfox-swagger-ui:2.9.2'

의존성이 추가된 후에는 프로젝트를 깨끗한 상태로 다시 빌드합니다.

Maven

mvn clean install

Gradle

./gradlew clean build

3. Swagger 설정 및 빈 생성 설정 검사

Swagger 설정이 잘못되거나 조건이 충족되지 않으면 'error creating bean with name 'apidocumentationscanner'' 오류가 발생할 수 있습니다. 따라서 Swagger 설정을 체크하고 필요한 경우 수정해야 합니다.

Swagger 설정 클래스에는 @Configuration, @EnableSwagger2, @Bean 어노테이션이 필요합니다. 아래와 같은 설정 클래스를 참고하여 확인하세요.

@Configuration
@EnableSwagger2
public class SwaggerConfig {

  @Bean
  public Docket apiDocket() {
    return new Docket(DocumentationType.SWAGGER_2)
          .select()
          .apis(RequestHandlerSelectors.any())
          .paths(PathSelectors.any())
          .build();
  }
}

또한, Spring 및 Swagger 설정에 충돌이 발생하여 오류가 발생할 수 있습니다. 따라서, Spring boot 설정이 올바르게 작성되었는지 확인해야 합니다.

application.yml 또는 application.properties 파일에서 Swagger 관련 프로퍼티가 정확한지 다시 한 번 확인하고, 필요한 경우 누락된 프로퍼티를 추가합니다.

swagger:
  enabled: true
  base-package: com.example.mypackage
  paths:
    - /api/.*

위의 방법으로 오류를 해결할 수 있습니다. 잘못된 빈 생성 설정이 문제였다면, 이를 수정하면 오류를 해결할 수 있습니다.

4. 오류 해결 및 결론

'error creating bean with name 'apidocumentationscanner'' 오류는 주로 Swagger 설정이 적절하지 않거나 의존성 문제로 발생합니다. 오류를 해결하기 위해 확인해야 할 사항들은 다음과 같습니다:

  1. 필요한 의존성이 추가되어 있는지 확인합니다. Maven 또는 Gradle을 사용한다면, 의존성 관리 도구를 통해 필요한 라이브러리를 추가합니다.
  2. 프로젝트를 다시 빌드하고 실행하며 오류가 사라졌는지 확인합니다.
  3. Swagger 설정클래스에 @Configuration, @EnableSwagger2, @Bean 어노테이션이 적절하게 사용되어 있는지 확인합니다.
  4. 조건에 따라, 프로젝트 설정파일의 Swagger 관련 프로퍼티들이 설정되어 있는지 확인합니다.

위의 점검 항목을 차례대로 확인하며, 오류 원인을 찾아 수정하면 'error creating bean with name 'apidocumentationscanner'' 오류를 해결할 수 있습니다. 오류 해결 이후, 프로젝트를 다시 빌드하고 실행하여 제대로 동작하는지 확인하세요.

Friday, June 16, 2023

SpringBootでCORSの問題を解決する方法【初心者向け】

SpringBootアプリケーションでのCORS問題の原因と解決策

この記事では、SpringBootアプリケーションでのCORS(Cross-Origin Resource Sharing)の問題の原因と解決策について説明します。これは、ウェブ開発者がよく直面する課題です。

CORSとは何ですか?

CORS(Cross-Origin Resource Sharing)は、ウェブアプリケーション間でリソースを共有する技術です。ウェブブラウザは、セキュリティ上の理由からデフォルトでSame-Originポリシーに従っており、他のドメインからのリソース要求を制限しています。CORSは、ウェブページとサーバーがリソースを共有することを許可する標準です。

CORSの問題が発生する原因

ウェブアプリケーションがAjaxリクエストを使用して他のドメインのリソースを要求する場合、CORSが別途構成されていないと、ブラウザはSame-Originポリシーによりリクエストをブロックします。これにより、データが正常に受信できなくなり、CORSの問題が発生します。

SpringBootでCORSの問題を解決する方法

SpringBootでは、CORSを構成する2つの方法があります。一つはグローバル構成、もう一つは個々のコントローラーの構成です。

a. グローバル構成:

WebMvcConfigurerインターフェイスを実装し、addCorsMappings()メソッドを使用すると、すべてのコントローラーに対してCORSを構成できます。

@Configuration
public class WebConfig implements WebMvcConfigurer {
 @Override
 public void addCorsMappings(CorsRegistry registry) {
 registry.addMapping("/**") // すべてのリクエストにCORS構成を適用
 .allowedOrigins("*") // すべてのドメインを許可
 .allowedMethods("*") // すべてのHTTPメソッドを許可
 .allowedHeaders("*") // すべてのHTTPヘッダーを許可
 .allowCredentials(true); // クッキー処理を許可
 }
}

b. 個々のコントローラーの構成:

@ControllerAdviceおよび@CrossOriginアノテーションを使用して、個々のコントローラークラスまたはメソッドに対してCORSを構成できます。

@RestController
@CrossOrigin(origins = "*", methods = {RequestMethod.GET, RequestMethod.POST})
public class MyController {
 // コントローラーメソッドコードを記述
}

結論

SpringBootでは、さまざまなCORS構成方法を使用して、簡単にCORSの問題を解決できます。状況に応じて、適切な方法を使用してCORSを構成できます。

SpringBoot에서 CORS 이슈 해결 방법

SpringBoot 애플리케이션에서 CORS(Cross-Origin Resource Sharing) 이슈 발생의 원인 및 해결 방법에 대해 설명하겠습니다.

1. CORS 란?

CORS(Cross-Origin Resource Sharing)는 웹 애플리케이션 간의 리소스 공유 기술입니다. 웹 브라우저는 보안상의 이슈로 인해 기본적으로 Same-Origin Policy를 따르며, 다른 도메인으로부터 리소스 요청을 제한합니다. CORS는 웹 페이지와 서버간의 리소스 공유를 허용하는 표준입니다.

2. 왜 CORS 이슈가 발생하는가?

웹 애플리케이션에서 Ajax 요청 등을 통해 다른 도메인의 리소스를 요청할 때 별도로 CORS 설정이 되어 있지 않으면, 브라우저는 Same-Origin Policy로 인해 해당 요청을 차단합니다. 이로 인해 데이터를 정상적으로 수신할 수 없게되며 CORS 이슈가 발생하게 됩니다.

3. SpringBoot에서 CORS 이슈 해결 방법

SpringBoot에서는 다음과 같이 두 가지 방법으로 CORS 설정을 할 수 있습니다.

a. 글로벌 설정:

WebMvcConfigurer 인터페이스를 구현하여 addCorsMappings() 메서드를 사용하면 전체 컨트롤러에 대한 CORS 설정을 할 수 있습니다.

@Configuration
public class WebConfig implements WebMvcConfigurer {
 @Override
 public void addCorsMappings(CorsRegistry registry) {
 registry.addMapping("/**") // 모든 요청에 대해 CORS 설정 적용
 .allowedOrigins("*") // 모든 도메인 허용
 .allowedMethods("*") // 모든 HTTP 메서드 허용
 .allowedHeaders("*") // 모든 HTTP 헤더 허용
 .allowCredentials(true); // 쿠키 정보 처리 허용
 }
}

b. 개별 컨트롤러 설정:

@ControllerAdvice 및 @CrossOrigin 어노테이션을 사용하여 개별 컨트롤러 클래스 또는 메서드에 대해 CORS 설정을 할 수 있습니다.

@RestController
@CrossOrigin(origins = "*", methods = {RequestMethod.GET, RequestMethod.POST})
public class MyController {
 // 컨트롤러 메서드 코드 작성
}

4. 결론

SpringBoot에서 다양한 CORS 설정 방법을 통해 간편하게 CORS 이슈를 해결할 수 있습니다. 상황에 따라 적절한 방법을 사용하여 CORS 설정을 하면 됩니다.

How to Fix CORS Issues in SpringBoot (with Examples)

Understanding and Resolving CORS Issues in SpringBoot Applications

In this article, we will explain the causes and solutions of CORS (Cross-Origin Resource Sharing) issues in SpringBoot applications.

1. What is CORS?

CORS (Cross-Origin Resource Sharing) is a technique for sharing resources between web applications. Web browsers, by default, follow the Same-Origin Policy for security reasons, restricting resource requests from other domains. CORS is a standard that allows web pages and servers to share resources.

2. Why do CORS issues occur?

When a web application uses Ajax requests to request resources from other domains, if CORS is not separately configured, the browser blocks the request due to the Same-Origin Policy. This prevents the data from being received normally, leading to a CORS issue.

3. How to Resolve CORS Issues in SpringBoot

There are two ways to configure CORS in SpringBoot.

a. Global Configuration:

By implementing the WebMvcConfigurer interface and using the addCorsMappings() method, you can configure CORS for all controllers.

@Configuration
public class WebConfig implements WebMvcConfigurer {
 @Override
 public void addCorsMappings(CorsRegistry registry) {
 registry.addMapping("/**") // Apply CORS configuration to all requests
 .allowedOrigins("*") // Allow all domains
 .allowedMethods("*") // Allow all HTTP methods
 .allowedHeaders("*") // Allow all HTTP headers
 .allowCredentials(true); // Allow cookie processing
 }
}

b. Configuration for Individual Controllers:

By using the @ControllerAdvice and @CrossOrigin annotations, you can configure CORS for individual controller classes or methods.

@RestController
@CrossOrigin(origins = "*", methods = {RequestMethod.GET, RequestMethod.POST})
public class MyController {
 // Write controller method code
}

4. Conclusion

In SpringBoot, you can easily resolve CORS issues using various CORS configuration methods. Depending on the situation, you can use the appropriate method to configure CORS.

Tuesday, June 13, 2023

Springboot2 Restdocsで「java.lang.NoSuchMethodException: java.util.List.()」エラーを3分で解決する方法

Restdocsで"java.lang.NoSuchMethodException"エラーを解決する

RestdocsはREST APIのテストに役立つツールですが、使用するのは複雑で時間がかかることがあります。最近、Restdocsを使っているときに"java.lang.NoSuchMethodException: java.util.List.<init>()"というエラーに遭遇しました。このエラーは、パラメータとしてリストを受け取っているコントローラーで発生しました。

解決策を探す

このエラーを解決しようと多くの資料を検索しましたが、明確な解決策を見つけるのは難しかったです。しかし、エラーを詳しく分析することで解決策を見つけることができました。

解決策

解決策は、パラメータとして受け取るコントローラーでリストを配列に変更することです。つまり、以下の変更を行うとエラーが解消されます。

// Before
public String getSomething(List<String> stringList) {

}

// After
public String getSomething(String[] stringArray) {

}

根本的な原因を理解する

このエラーの根本的な原因は、webMvcTestがリストを正しく認識できないことです。Spring Bootの自動設定は非常に便利ですが、このような状況では混乱を招くことがあります。

結論

この記事が、Restdocsを使用している際にエラーに遭遇した方々の助けになれば幸いです。

How to Fix Spring Boot Restdocs java.lang.NoSuchMethodException: java.util.List.() Error

Resolving "java.lang.NoSuchMethodException" Error in Restdocs

Restdocs is a valuable tool for testing REST APIs, but using it can sometimes be intricate and time-consuming. Recently, I came across the error "java.lang.NoSuchMethodException: java.util.List.<init>()" while utilizing Restdocs. This error surfaced in the controller where I was receiving a list as a parameter.

Seeking the Solution

I sifted through a plethora of resources in an attempt to rectify this error, but a clear solution was difficult to find. However, I managed to find a solution by carefully analyzing the error.

The Solution

The resolution is to modify the list to an array in the controller that receives it as a parameter. In other words, implementing the following changes will mitigate the error.

// Before
public String getSomething(List<String> stringList) {

}

// After
public String getSomething(String[] stringArray) {

}

Understanding the Root Cause

The root cause of this error is that webMvcTest cannot correctly identify the List. While Spring Boot's auto-configuration is highly convenient, it can sometimes lead to confusion in scenarios like this one.

Conclusion

I hope this article will be beneficial for those who are grappling with errors while using Restdocs.

Monday, June 12, 2023

VSCodeのクリーン&リスタートでビルドエラーを解消する方法

VSCodeでのNoClassDefFoundErrorの解決方法

みなさん、こんにちは!今日は、予期せぬビルドエラーに対処する方法についてお話します。

NoClassDefFoundErrorが発生した経験

数か月前、問題なく実行されていたプロジェクトが突然NoClassDefFoundErrorというビルドエラーをスローし始めました。何の理由もないのに起こったように感じました。

一般的な解決策と疑問

解決策をGoogleで検索したところ、多くの人が.jar形式の対応するクラスファイルパッケージを追加するようにアドバイスされました。しかし、以前はパッケージを追加せずにプロジェクトを問題なく実行できていたのに、なぜ今そうなるのか疑問でした。

別の解決策:VSCode のリスタート機能

そこで、別の解決策を探すことにしました。以前Android向けに開発したときに似たような問題が発生し、クリーン&リスタート機能を使って解決したことを思い出しました。そこで、VSCodeで同様の機能を探しました。

VSCode Restart Function

VSCODE の再起動コマンド: ctrl(cmd)+shift+p

Error 解消結果及び助言

その結果、同様の機能を見つかり、試してみたところ、エラーがきれいに解消されました。この経験から、プロジェクトの問題が発生した場合、パッケージを追加する以外にも他の方法を検討する必要があることを皆さんに伝えたいと思います。各開発環境で提供されているクリーン&リスタートなどの同様の機能を使用して問題を解決することができます。

この記事が、予期せぬエラーに直面したときに役立つことを願っています。

How to Fix NoClassDefFoundError in Spring Boot with VSCode

How to Handle Unexpected Build Errors in Project Development

Hello everyone! Today, we will delve into how to tackle unexpected build errors that may occasionally occur during project development.

Encountering NoClassDefFoundError: A Personal Experience

A few months back, I faced a situation where a project, which was running smoothly, suddenly started throwing a NoClassDefFoundError and a build error. Interestingly, it seemed as if the problem had occurred without any apparent reason.

Seeking Solutions Online

In my quest for solutions, I turned to Google. Many responses suggested adding the corresponding class file package in .jar format. However, this advice was not convincing, as the project had been running fine without the need to add the package previously.

Exploring an Alternative Solution

I decided to look for another solution. During my Android development days, I had faced similar issues, and using the clean and restart functions often solved them. Consequently, I began looking for similar functions in VSCode.

VSCode command palette
ctrl(cmd)+shift+p

In VSCode, I found a function similar to clean and restart and decided to give it a try. To my surprise, this method neatly resolved the error!

A Helpful Tip for Troubleshooting Project Issues

This experience taught me that when encountering problems with your projects, do not just stick to one method, like adding packages. Try exploring other alternatives too! Functions such as clean and restart provided by various development environments can indeed be surprisingly effective.

I hope this article will be of help when you face unexpected errors in your projects.

Groovyライブラリのロードエラーの修正方法 - org.codehaus.groovy.runtime.InvokerHelperの初期化に失敗

SpringbootとGradleを使用したJavaベースのWebアプリケーション開発

SpringbootとGradleは、JavaベースのWebアプリケーション開発で広く使用されるオープンソースツールです。しかし、これらを組み合わせて使用すると、"Could not initialize class org.codehaus.groovy.runtime.InvokerHelper"などのエラーが発生することがあります。

Groovyライブラリのロード問題の解決法

このエラーは、通常、Gradleによって使用されるGroovyライブラリファイルが正しくロードされないために発生します。このような状況では、Gradleを最新バージョンにアップグレードし、システムを再起動することで問題を解決できます。

macOSでのGradleのアップグレード方法

macOSでは、Homebrewを使用することで簡単にGradleを最新バージョンにアップグレードできます。以下のコマンドを実行してください:

brew upgrade gradle

このコマンドを実行すると、Gradleは最新バージョンにアップグレードされ、前のバージョンが原因で発生したエラーが解消されます。

システムエラーのトラブルシューティング

システムエラーが発生した場合、エラーメッセージを冷静に分析し、適切な対策を講じることが有益です。"Could not initialize class org.codehaus.groovy.runtime.InvokerHelper"エラーの場合、通常、Gradleを最新バージョンにアップグレードすることで問題が解決します。

How to Fix Groovy Library Loading Errors - Could Not Initialize org.codehaus.groovy.runtime.InvokerHelper

Developing Java-based Web Applications with Springboot and Gradle

Springboot and Gradle are open-source software tools widely used in the development of Java-based web applications. However, when used in conjunction, they can occasionally cause errors such as "Could not initialize class org.codehaus.groovy.runtime.InvokerHelper".

Resolving Groovy Library Loading Issues

This error typically arises due to the Groovy library files, utilized by Gradle, not being loaded correctly. In most instances, you can resolve this issue by upgrading Gradle to the latest version and restarting the system.

How to Upgrade Gradle on macOS

In macOS, you can conveniently upgrade Gradle to the latest version using Homebrew. To do this, execute the following command:

brew upgrade gradle

Once this command is run, Gradle will be upgraded to its latest version, resolving any errors that might have arisen due to its previous version.

Troubleshooting System Errors

When system errors occur, it's often beneficial to calmly analyze the error message and take appropriate action. In the case of the "Could not initialize class org.codehaus.groovy.runtime.InvokerHelper" error, upgrading Gradle to its latest version usually resolves the issue.

Wednesday, May 31, 2023

Understanding the @PersistenceContext Annotation in Spring JPA

Spring and JPA: Understanding the PersistenceContext Annotation

In Spring and JPA integration, the PersistenceContext annotation plays a pivotal role by injecting EntityManager instances. The EntityManager serves as a crucial bridge managing the state of entity objects between your application and the database.

Applying PersistenceContext Annotation in Spring

The PersistenceContext annotation is employed to inject the EntityManager in Spring as follows:

@PersistenceContext
private EntityManager entityManager;

In a typical Spring Boot project setup, you would configure your bean in this manner:

@Bean
public EntityManager entityManager(EntityManagerFactory entityManagerFactory) {
    return entityManagerFactory.createEntityManager();
}

Working Principle of PersistenceContext Annotation

For variables of type EntityManager annotated with @PersistenceContext, Spring creates and injects a proxy instance. This approach enables handling functionalities related to persistence context without being tied to specific implementations.

Persistence Context Operations within Transaction Scope

The proxy instance can execute operations related to persistence context within an application's transaction scope. Specifically, it manages currently active transactions and terminates them along with their respective persistence contexts when they end. This mechanism ensures necessary persistence management within transaction scopes.

Main Features of PersistenceContext Annotation

  • Efficient Management of EntityManager Instances: With the use of PersistenceContext annotation, effective management of non-thread-safe EntityManager instances is achievable. Each request should ideally have its independent instance created and managed.
  • Flexibility in Configuration: The default behavior binds the EntityManager to transaction scope inside a Spring container via various configurations available for PersistenceContext. However, this behavior can be customized according to user requirements.

Spring JPA에서 PersistenceContext 어노테이션 활용하기

Spring과 JPA에서 PersistenceContext 어노테이션 활용하기

Spring과 JPA를 함께 사용하는 개발자들에게는 PersistenceContext 어노테이션이 필수적입니다. 이는 EntityManager 인스턴스를 주입하는데 사용되며, 이 EntityManager는 데이터베이스와 애플리케이션 사이에서 엔티티 객체의 상태를 관리하는 중요한 역할을 합니다.

PersistenceContext 어노테이션의 적용 방법

Spring 환경에서는 PersistenceContext 어노테이션을 다음과 같은 방식으로 EntityManager에 주입할 수 있습니다:

@PersistenceContext
private EntityManager entityManager;

특히 Spring Boot 프로젝트에서는 아래와 같은 방식으로 Bean 설정을 할 수 있습니다:

@Bean
public EntityManager entityManager(EntityManagerFactory entityManagerFactory) {
    return entityManagerFactory.createEntityManager();
}

PersistenceContext 어노테이션 동작 원리

@PersistenceContext 어노테이션이 붙은 EntityManager 타입 변수에 대해서 Spring은 프록시 인스턴스를 생성하여 주입합니다. 프록시가 사용되면, 구체적인 구현과 연결되지 않고도 영속성 컨텍스트와 관련된 기능들의 구현 및 호출 처리가 가능합니다.

트랜잭션 범위 내 영속성 컨텍스트 작동 방식

영속성 컨텍스트와 관련된 동작들은 트랜잭션 범위 내에서 프록시 인스턴스가 필요한 관리 및 동기화 작업들을 실행할 수 있습니다. 특별히, 프록시는 현재 활성화된 트랜잭션을 관리하고, 트랜잭션이 종료되면 영속성 컨텍스트도 함께 종료됩니다. 이를 통해 트랜잭션 범위 내에서 필요한 영속성 관리 기능들이 제공됩니다.

PersistenceContext 어노테이션의 주요 특징

  • EntityManager 인스턴스 관리: PersistenceContext 어노테이션을 사용하면 EntityManager 인스턴스를 효과적으로 관리할 수 있습니다. EntityManager는 스레드 세이프가 아니므로 공유할 수 없습니다. 따라서 각 요청마다 독립된 인스턴스를 생성하고 관리하는 것이 권장됩니다.
  • 설정 가능성: PersistenceContext는 다양한 방법으로 설정할 수 있으며, 기본 동작은 Spring 컨테이너 내에서 EntityManager를 트랜잭션 범위에 바인딩하는 것입니다. 그러나 이 동작은 사용자에 의해 변경 가능합니다.

SpringとJPAでPersistenceContextアノテーションを効果的に使用する方法

PersistenceContextアノテーションについて

SpringでJPAを使用する際、PersistenceContextアノテーションはEntityManagerをインジェクトするために使用されます。EntityManagerはデータベースとアプリケーションの間でエンティティオブジェクトの状態を管理するオブジェクトです。

PersistenceContextアノテーションの具体的な使用方法

Springでは、PersistenceContextアノテーションを使用してEntityManagerを以下のようにインジェクトできます:

@PersistenceContext
private EntityManager entityManager;

特に、Spring Bootプロジェクトでは、次のようにビーン設定が可能です:

@Bean
public EntityManager entityManager(EntityManagerFactory entityManagerFactory) {
    return entityManagerFactory.createEntityManager();
}

PersistenceContextアノテーションの動作原理

Springは@PersistenceContextアノテーションが付いたEntityManager型変数へプロキシインスタンスを生成し、それを注入します。これにより具体的な実装と独立して永続性コンテキスト関連機能の実装と呼び出し処理が可能となります。

トランザクショントランザクショントランザクショントランザクショントランザクショントランザクショントランザクショントランザクショナルスコープ内での永続性コンテキスト操作

永続性コンテキスト関連操作は、トランザクショナルスコープ内で必要な管理および同期操作が行われることから可能となります。特筆すべき点として、現在有効なトランザクショナル処理はプロキシが管理し、その終了時点で永続性コンテキストも同時終了します。これら一連動作により、トランザクショナルスコープ内で必要な永続性管理機能が提供されます。

PersistenceContextアノテーションの主な特徴

  • EntityManagerインスタンスの効率的な管理: PersistenceContextアノテーションを使用すると、EntityManagerインスタンスを効率的に管理できます。EntityManagerはスレッドセーフではないため、共有できません。したがって、各リクエストごとに独立したインスタンスを作成および管理することが推奨されます。
  • 設定可能性: PersistenceContextはさまざまな方法で設定可能であり、デフォルトの動作はSpringコンテナ内でEntityManagerをトランザクショナルスコープにバインドすることです。しかし、この動作はカスタマイズ可能です。

Tuesday, May 30, 2023

Springboot와 MySQL을 사용하여 Full-Text 검색 기능 구현하기

Springboot와 MySQL을 사용하여 Full-Text 검색 기능 구현하기

이 문서에서는 Spring과 MySQL을 사용하여 기본 Full-Text 검색 기능을 구현하는 방법을 소개합니다.

1. MySQL Full-Text 지원 테이블 생성

MySQL에서 Full-Text 검색을 사용하려면 해당 테이블에 FULLTEXT 인덱스를 만들어야 합니다. 아래 예시와 같이 필요한 열에 FULLTEXT 인덱스를 생성합니다:

CREATE TABLE articles (
    id INT UNSIGNED AUTO_INCREMENT PRIMARY KEY,
    title VARCHAR(200),
    content TEXT,
    FULLTEXT (title, content)
) ENGINE=InnoDB;

2. Spring Boot 프로젝트에 MySQL 연결

Spring Boot에서 MySQL에 연결하려면 pom.xml에 MySQL Connector/J 의존성을 추가해야 합니다:

<dependency>
    <groupId>mysql</groupId>
    <artifactId>mysql-connector-java</artifactId>
</dependency>

그리고, application.properties 파일에 다음과 같이 MySQL 연결 정보를 설정합니다:

spring.datasource.url=jdbc:mysql://localhost:3306/your_database?useSSL=false&serverTimezone=UTC
spring.datasource.username=your_username
spring.datasource.password=your_password
spring.jpa.hibernate.ddl-auto=update

3. Article Entity 및 Repository 생성

Article Entity 및 ArticleRepository를 생성하여 데이터베이스와 연결을 설정합니다:

@Entity
public class Article {
    @Id @GeneratedValue(strategy = GenerationType.IDENTITY)
    private Long id;

    private String title;
    private String content;

    // 생략: Getters, Setters, and Constructors
}
@Repository
public interface ArticleRepository extends JpaRepository<Article, Long> {
}

4. Full-Text 검색을 위한 Custom Query 생성

ArticleRepository에 Custom Query를 생성하여 MySQL의 Full-Text 검색 기능을 활용할 수 있도록 합니다:

@Query(value = "SELECT * FROM articles WHERE MATCH (title, content) AGAINST (?1)", nativeQuery = true)
List<Article> fullTextSearch(String keyword);

이제 fullTextSearch 메소드를 사용하여 제목과 내용에 일치하는 키워드를 포함하는 모든 기사를 검색할 수 있습니다.

5. 검색 기능을 사용하는 REST API 구현

검색 기능을 사용하는 REST API를 구현하려면 Spring Web 의존성도 추가해야 합니다:

<dependency>
  <groupId>org.springframework.boot</groupId>
  <artifactId>spring-boot-starter-web</artifactId>
</dependency>

이제 검색 컨트롤러를 생성할 수 있습니다:

@RestController
@RequestMapping("/api/articles")
public class ArticleController {
    private final ArticleRepository articleRepository;

    // 의존성 주입 
    public ArticleController(ArticleRepository articleRepository) {
        this.articleRepository = articleRepository;
    }

   @GetMapping("/search")
   public List<Article> search(@RequestParam String keyword) {
       return articleRepository.fullTextSearch(keyword);
   }
}
 

이렇게 하면 /api/articles/search?keyword=검색어 엔드포인트를 통해 검색 기능을 사용할 수 있습니다.

필요에 따라 Full-Text 검색 기능을 커스터마이징하거나 확장할 수 있습니다. 이 문서는 Springboot와 MySQL을 사용하여 기본 Full-Text 검색 기능을 구현하는 방법을 소개하였습니다. 원하는대로 검색 기능을 적용하기 위해 이 가이드를 참조하세요.

Implementing Full-Text Search Functionality Using Spring and MySQL

Implementing Full-Text Search Functionality Using Spring and MySQL

This document introduces how to implement basic full-text search functionality using Spring and MySQL.

1. Create MySQL Full-Text Supported Table

To use full-text search in MySQL, you need to create a FULLTEXT index on the relevant table. Create the FULLTEXT index on the required columns as shown in the example below:

CREATE TABLE articles (
    id INT UNSIGNED AUTO_INCREMENT PRIMARY KEY,
    title VARCHAR(200),
    content TEXT,
    FULLTEXT (title, content)
) ENGINE=InnoDB;

2. Connect MySQL to a Spring Boot Project

To connect MySQL to a Spring Boot application, you need to add the MySQL Connector/J dependency to your pom.xml:

<dependency>
    <groupId>mysql</groupId>
    <artifactId>mysql-connector-java</artifactId>
</dependency>

Then, configure the MySQL connection information in the application.properties file as follows:

spring.datasource.url=jdbc:mysql://localhost:3306/your_database?useSSL=false&serverTimezone=UTC
spring.datasource.username=your_username
spring.datasource.password=your_password
spring.jpa.hibernate.ddl-auto=update

3. Create Article Entity and Repository

Create the Article entity and ArticleRepository to establish a connection with the database:

@Entity
public class Article {
    @Id @GeneratedValue(strategy = GenerationType.IDENTITY)
    private Long id;

    private String title;
    private String content;

    // Omitted: Getters, Setters, and Constructors
}
@Repository
public interface ArticleRepository extends JpaRepository<Article, Long> {
}

4. Create Custom Query for Full-Text Search

Create a custom query in the ArticleRepository to leverage MySQL's full-text search functionality:

@Query(value = "SELECT * FROM articles WHERE MATCH (title, content) AGAINST (?1)", nativeQuery = true)
List<Article> fullTextSearch(String keyword);

Now you can use the fullTextSearch method to search for all articles containing keywords in the title and content.

5. Implement REST API for Using the Search Functionality

To implement a REST API that uses the search functionality, you also need to add the Spring Web dependency:

<dependency>
  <groupId>org.springframework.boot</groupId>
  <artifactId>spring-boot-starter-web</artifactId>
</dependency>

You can now create a search controller:

@RestController
@RequestMapping("/api/articles")
public class ArticleController {
    private final ArticleRepository articleRepository;

    // Dependency injection 
    public ArticleController(ArticleRepository articleRepository) {
        this.articleRepository = articleRepository;
    }

   @GetMapping("/search")
   public List<Article> search(@RequestParam String keyword) {
       return articleRepository.fullTextSearch(keyword);
   }
}
 

This allows you to use the search functionality through the /api/articles/search?keyword=search_term endpoint..

You can customize or extend your full-text search functionality as needed. This document introduced how to implement basic full-text search functionality using Spring and MySQL. Please refer to this guide to apply the search functionality as desired.

SpringとMySQLを用いた全文検索機能の実装

SpringとMySQLを使用した全文検索機能の実装

この文書では、SpringとMySQLを使用して基本的な全文検索機能を実装する方法を紹介します。

1. MySQL全文検索対応テーブルの作成

MySQLで全文検索を使用するには、該当するテーブルにFULLTEXTインデックスを作成する必要があります。以下の例のように必要な列にFULLTEXTインデックインデックスを作成します。

CREATE TABLE articles (
    id INT UNSIGNED AUTO_INCREMENT PRIMARY KEY,
    title VARCHAR(200),
    content TEXT,
    FULLTEXT (title, content)
) ENGINE=InnoDB;

2. MySQLをSpring Bootプロジェクトに接続

MySQLをSpring Bootアプリケーションに接続するには、pom.xmlにMySQL Connector/Jの依存関係を追加する必要があります。

<dependency>
    <groupId>mysql</groupId>
    <artifactId>mysql-connector-java</artifactId>
</dependency>

次に、application.propertiesファイルに以下のようにMySQLの接続情報を設定します。

spring.datasource.url=jdbc:mysql://localhost:3306/your_database?useSSL=false&serverTimezone=UTC
spring.datasource.username=your_username
spring.datasource.password=your_password
spring.jpa.hibernate.ddl-auto=update

3. Articleエンティティとリポジトリの作成

データベースとの接続を確立するために、ArticleエンティティとArticleRepositoryを作成します。

@Entity
public class Article {
  @Id @GeneratedValue(strategy = GenerationType.IDENTITY)
  private Long id;

  private String title;
  private String content;

  // 省略:Getter、Setter、およびコンストラクタ
}
@Repository
public interface ArticleRepository extends JpaRepository<Article, Long> {
}

4. 全文検索用のカスタムクエリの作成

ArticleRepositoryにカスタムクエリを作成して、MySQLの全文検索機能を活用します。

@Query(value = "SELECT * FROM articles WHERE MATCH (title, content) AGAINST (?1)", nativeQuery = true)
List<Article> fullTextSearch(String keyword);

これで、fullTextSearchメソッドを使用してタイトルとコンテンツにキーワードが含まれるすべての記事を検索できます。

5. 検索機能を使用するためのREST APIの実装

検索機能を使用するREST APIを実装するには、Spring Webの依存関係も追加する必要があります。

<dependency>
    <groupId>org.springframework.boot</groupId>
    <artifactId>spring-boot-starter-web</artifactId>
</dependency>

これで、検索コントローラーを作成できます。

@RestController
@RequestMapping("/api/articles")
public class ArticleController {
    private final ArticleRepository articleRepository;

    // 依存性注入(Dependency Injection)
    public ArticleController(ArticleRepository articleRepository) {
        this.articleRepository = articleRepository;
    }

    @GetMapping("/search")
    public List<Article> search(@RequestParam String keyword) {
        return articleRepository.fullTextSearch(keyword);
    }
}

これにより、/api/articles/search?keyword=検索キーワードエンドポイントを介して検索機能を使用できます。

必要に応じて、全文検索機能をカスタマイズまたは拡張できます。この文書では、SpringとMySQLを使用して基本的な全文検索機能を実装する方法を紹介しました。必要な全文検索能力を適用するためにこのガイドラインを参照してください。

Monday, February 8, 2021

AWS EC2에서 Out of Memory 문제 해결 방법

AWS EC2 인스턴스에서의 메모리 문제 해결 방법

AWS의 EC2 인스턴스를 사용하면서 Spring Boot와 MySQL로 서비스를 배포하다가 서버 다운 문제에 직면하셨나요? 이 글에서는 그런 문제를 어떻게 해결했는지 공유드리겠습니다.

문제 상황

매일 한 번씩 서버가 다운되었습니다. 처음에는 로그 관리를 하지 않아 원인을 알 수 없었습니다.

AWS 콘솔에서의 문제 확인

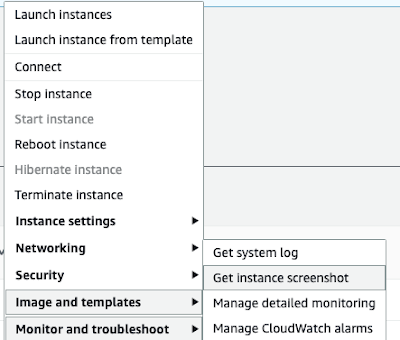
AWS 콘솔의 EC2 항목에서 Monitor and Troubleshoot 기능을 이용하여 확인해 보니, 익숙한 메시지를 발견했습니다. OOM(Out of Memory)와 관련된 문제였습니다. 프리티어에서 제공하는 메모리가 1GB밖에 없어서 발생하는 것으로, 스왑 메모리 설정이 필요함을 알게 되었습니다.

aws console EC2
aws console EC2

문제 해결 방법

먼저 관리자 계정으로 로그인합니다.(EC2 관리자 계정 비밀번호를 설정하지 않았다면, 최초 설정 후 로그인이 가능합니다.) 그 후 아래 명령어들을 실행하여 스왑 메모리를 설정합니다:

root# dd if=/dev/zero of=/mnt/swapfile bs=1M count=2048
root# sudo mkswap /mnt/swapfile
root# swapon /mnt/swapfile

free 명령어로 스왑 메모리가 설정되었는지 확인할 수 있습니다.

결과 확인

제대로 설정되었다면, 서버가 정상으로 구동되는 것을 확인할 수 있습니다. 이전에 비슷한 문제를 경험하셨다면, 같은 원인 때문이 아닐까 추정됩니다.

참고:

https://aws.amazon.com/ko/premiumsupport/knowledge-center/ec2-memory-swap-file/

Tuesday, January 26, 2021

Could not initialize class org.codehaus.groovy.runtime.InvokerHelper 해결법

Springboot와 Gradle 함께 사용 시 발생하는 오류 해결 방법

Java 기반의 웹 애플리케이션 개발에는 Springboot와 Gradle 같은 오픈소스 소프트웨어가 자주 활용됩니다. 이들을 함께 사용하면서 "Could not initialize class org.codehaus.groovy.runtime.InvokerHelper" 같은 오류를 경험하신 적이 있으신가요? 이 글에서는 그 원인과 해결 방법에 대해 설명드리겠습니다.

Groovy 라이브러리 로딩 문제

위에서 언급한 오류는 주로 Gradle에서 사용되는 Groovy 라이브러리 파일들이 제대로 로드되지 않아 발생합니다. 이 문제를 해결하기 위해서는 gradle의 버전을 최신으로 업그레이드하는 것을 권장합니다.

Gradle 버전 업그레이드 방법

macOS의 경우, Homebrew를 활용하여 간단하게 gradle을 최신 버전으로 업그레이드할 수 있습니다. 아래 명령어를 통해 gradle을 최신 버전으로 업그레이드해보세요:

brew upgrade gradle

문제 해결 후기

gradle 버전을 최신으로 업데이트함으로써, 이전 버전에서 발생했던 오류 문제점들은 대부분 해결됩니다. 따라서 시스템 오류 발생 시, 차분하게 오류 메시지를 분석하고 적절한 조치를 취하는 것도 중요합니다.