Showing posts with label Android. Show all posts

Tuesday, December 5, 2023

WebRTCとgRPCの融合:リアルタイムコミュニケーションでの適用と活用

はじめに:WebRTCとgRPCの簡単な説明

WebRTC(Web Real-Time Communication)は、プラグインの助けなしにWebブラウザ間でリアルタイムの音声、ビデオ、データ通信を可能にするAPIとプロトコルを指します。これはP2P(Peer-to-Peer)通信技術に基づいており、これを通じてユーザーはリアルタイムで高画質のマルチメディア情報を送受信できます。

一方、gRPC(Google Remote Procedure Call)は、Googleによって開発されたオープンソースのリモートプロシージャコール(RPC)フレームワークです。これはサーバーとクライアント間の通信を簡略化し、マイクロサービス、モバイルアプリケーション、分散システムなどで使用されます。gRPCは、構造化データの直列化のためのメカニズムであるProtocol Buffersを使用します。

この記事では、これら2つの技術、つまりWebRTCとgRPCが出会ったときにどのようなシナジー効果が得られるか、そして実際にどのように適用および利用できるかについて詳しく見ていきます。

WebRTCとgRPCの特徴と違い

WebRTCは、P2P(Peer-to-Peer)通信方式を利用したブラウザ間のリアルタイム通信を実現する技術です。各ブラウザが直接サーバーを経由せずに通信することで、リアルタイム性が要求される音声、ビデオ、データ通信に有用です。さらに、WebRTCは高品質なマルチメディア情報を送受信する機能を提供します。

一方、gRPCはGoogleが開発したRPC(Remote Procedure Call)フレームワークで、サーバーとクライアント間の通信を簡素化する役割を果たします。gRPCはProtocol Buffersを使用して構造化データを直列化し、これによりデータ転送効率と速度が優れています。マイクロサービス、モバイルアプリケーション、分散システムなどで広く使用されています。

したがって、WebRTCとgRPCはそれぞれリアルタイム通信と効率的なデータ転送に焦点を当てた技術ですが、これら2つの技術を組み合わせることで、リアルタイム通信に必要なデータ転送効率を大幅に向上させることができます。さらに、gRPCの構造化されたデータ転送方式は、WebRTCのリアルタイム通信において、より高速で安定したデータ転送を可能にします。

gRPCをWebRTCに適用する方法

gRPCをWebRTCに適用するには、まずgRPCのクライアントとサーバーを作成する必要があります。これには、Googleが提供する公式gRPCライブラリを使用できます。これらのライブラリはさまざまなプログラミング言語をサポートしているため、開発環境に合わせて選択し使用できます。

次に、gRPCサーバーを生成し、これをWebRTCのシグナリングサーバーとして使用します。このサーバーは、WebRTCピア間でメタデータを交換する役割を果たします。つまり、ピアが互いを見つけ、通信を開始できるように支援する役割です。

import grpc
from concurrent import futures
import time

# gRPCサーバーの作成  
server = grpc.server(futures.ThreadPoolExecutor(max_workers=10))

# サーバーの起動
server.start()

# サーバーが常に実行されるように保持
try:
    while True:
        time.sleep(86400) 
except KeyboardInterrupt:
    server.stop(0)  

最後に、gRPCクライアントを作成し、これを通じてWebRTCピアとのリアルタイム通信を開始します。この際、gRPCクライアントはWebRTCピアにシグナルを送り、受信した応答を処理する役割を果たします。

  
import grpc

# gRPCクライアントの作成
channel = grpc.insecure_channel('localhost:50051') 

# クライアントを通じたシグナル送信と応答の処理
response = stub.SayHello(helloworld_pb2.HelloRequest(name='you'))
print("Greeter client received: " + response.message)

gRPCを適用したWebRTCの利用事例

gRPCを適用したWebRTCは、リアルタイム通信が必要なさまざまな分野で利用できます。代表的な事例として、次のようなものがあります。

1. リアルタイムビデオストリーミングサービス: gRPCの優れたデータ転送効率は、リアルタイムビデオストリーミングサービスにおいて大きなメリットとなります。WebRTCによるリアルタイムビデオ送信とgRPCのデータ転送効率を組み合わせることで、高画質ビデオをリアルタイムにストリーミングするために必要な帯域幅を削減できます。

2. リアルタイムマルチプレイゲーム: リアルタイムマルチプレイゲームでは、参加者間の通信遅延を最小限に抑えることが重要です。これにはgRPCを適用したWebRTCを使用することで、高速で安定したP2P通信によりゲーム参加者間のリアルタイムインタラクションを実現できます。

3. リアルタイムチャットサービス: リアルタイムチャットサービスでは、メッセージをリアルタイムで送受信することが重要です。gRPCを適用したWebRTCを使用することで、構造化されたデータ転送によりメッセージ送信の効率性と信頼性を向上できます。

Wednesday, November 8, 2023

안드로이드 유닛 테스트를 위한 가이드

  1. 안드로이드 유닛 테스트란?
  2. 안드로이드 클래스를 mock하는 방법
  3. JUnit 테스트를 빠르게 만드는 방법
  4. 안드로이드 유닛 테스트의 이점

안드로이드 유닛 테스트란?

안드로이드 유닛 테스트는 단일 기능을 테스트하는 프로세스로, 애플리케이션의 독립된 부분이 예상대로 작동하는지 확인합니다. 이는 소프트웨어 개발의 초기 단계에서 발생할 수 있는 버그를 찾아내고 수정하는 데 도움이 됩니다. 또한, 테스트 주도 개발(TDD)의 핵심적인 부분이기도 합니다.

안드로이드 플랫폼에서는 JUnit과 같은 테스팅 프레임워크를 사용하여 유닛 테스트를 실행할 수 있습니다. 이를 통해 애플리케이션의 각 부분이 정상적으로 작동하는지 확인하고, 기능이 추가되거나 변경될 때 발생할 수 있는 잠재적인 문제를 미리 파악할 수 있습니다.

코드의 품질을 높이고 유지보수를 용이하게 하기 위해 안드로이드 유닛 테스트는 개발 프로세스에서 중요한 역할을 합니다.

안드로이드 클래스를 mock하는 방법

안드로이드 클래스를 mock하는 것은 유닛 테스트에서 매우 중요합니다. mock 객체를 사용하면 실제 객체를 만들 필요 없이 해당 객체의 동작을 시뮬레이션할 수 있습니다. 이는 테스트의 복잡성을 줄이고, 테스트를 더 효율적으로 만드는 데 도움이 됩니다.

안드로이드에서는 Mockito와 같은 라이브러리를 사용하여 클래스를 mock할 수 있습니다. Mockito는 테스트를 위한 강력한 프레임워크로, mock 객체를 쉽게 생성하고 관리할 수 있게 해줍니다.

<dependencies>
  <dependency>
    <groupId>org.mockito</groupId>
    <artifactId>mockito-core</artifactId>
    <version>3.1.0</version>
    <scope>test</scope>
  </dependency>
</dependencies>

위와 같이 build.gradle 파일에 Mockito를 추가하여 사용할 수 있습니다. 이후, 테스트 클래스에서는 @Mock 애너테이션을 사용하여 mock 객체를 생성할 수 있습니다.

JUnit 테스트를 빠르게 만드는 방법

JUnit 테스트의 실행 속도를 높이는 것은 개발 프로세스를 더욱 효율적으로 만들어 줍니다. 테스트의 빠른 실행은 개발자가 코드 변경에 대한 피드백을 더 빨리 받을 수 있게 해주며, 이는 결국 개발 시간을 단축시키는 데 도움이 됩니다.

JUnit 테스트를 빠르게 만드는 방법 중 하나는 필요한 최소한의 설정만 사용하는 것입니다. 이는 테스트 실행 시간을 줄이는 데 도움이 됩니다. 예를 들어, 데이터베이스 연결이 필요 없는 테스트에서는 이를 설정하지 않는 것이 좋습니다.

또 다른 방법은 테스트를 병렬로 실행하는 것입니다. JUnit 5부터는 @Execution 애너테이션을 사용하여 테스트를 병렬로 실행할 수 있습니다. 이를 통해 테스트 실행 시간을 크게 줄일 수 있습니다.

<@Execution(ExecutionMode.CONCURRENT)>
public class MyTestClass {
    // ...
}

위와 같이 @Execution 애너테이션을 테스트 클래스에 추가하여 병렬 실행을 활성화할 수 있습니다.

안드로이드 유닛 테스트의 이점

안드로이드 유닛 테스트는 애플리케이션 개발에 있어 많은 이점을 제공합니다. 첫째, 유닛 테스트는 코드의 신뢰성을 향상시킵니다. 예상치 못한 문제를 빠르게 발견하고, 코드 변경이 기존의 기능에 영향을 미치지 않는지 확인할 수 있습니다.

둘째, 유닛 테스트는 리팩토링을 안전하게 만들어 줍니다. 테스트 케이스가 통과한다면, 리팩토링이 기존 기능을 손상시키지 않았음을 확신할 수 있습니다.

셋째, 유닛 테스트는 코드의 설계를 개선합니다. 테스트 가능한 코드는 재사용성이 높고, 모듈화가 잘 되어 있으며, 더욱 명확한 인터페이스를 갖습니다.

넷째, 유닛 테스트는 팀의 생산성을 향상시킵니다. 테스트 코드는 새로 합류한 팀원이 프로젝트를 이해하는 데 도움이 됩니다. 또한, 모든 팀원이 코드의 기능과 목표를 명확하게 이해할 수 있도록 해줍니다.

A Guide to Android Unit Testing

  1. What is Android Unit Testing?
  2. How to Mock Android Classes
  3. Ways to Speed up JUnit Tests
  4. Advantages of Android Unit Testing

What is Android Unit Testing?

Android unit testing is a process of testing individual functionalities to ensure that isolated parts of an application work as expected. It helps in discovering and fixing bugs that may occur in the early stages of software development. It is also a crucial part of Test-Driven Development (TDD).

In the Android platform, you can execute unit tests using testing frameworks like JUnit. This allows you to verify that each part of the application functions correctly and identifies potential issues that may arise when features are added or modified.

Android unit testing plays a significant role in improving code quality and making maintenance more manageable in the development process.

How to Mock Android Classes

Mocking Android classes is essential in unit testing. Mock objects allow you to simulate the behavior of actual objects without the need to create the real ones. This reduces test complexity and makes testing more efficient.

In Android, you can use libraries like Mockito to mock classes. Mockito is a powerful framework for testing that makes it easy to create and manage mock objects.

<dependencies>
  <dependency>
    <groupId>org.mockito</groupId>
    <artifactId>mockito-core</artifactId>
    <version>3.1.0</version>
    <scope>test</scope>
  </dependency>

You can add Mockito to your build.gradle file as shown above to use it. Then, in your test classes, you can create mock objects using the @Mock annotation.

Ways to Speed up JUnit Tests

Increasing the execution speed of JUnit tests makes the development process more efficient. Faster test execution provides developers with quicker feedback on code changes, ultimately reducing development time.

One way to speed up JUnit tests is to use minimal necessary configurations. This helps reduce test execution time. For example, for tests that don't require a database connection, it's advisable not to set up the database.

Another approach is running tests in parallel. Starting from JUnit 5, you can use the @Execution annotation to run tests in parallel, significantly reducing test execution time.

<@Execution(ExecutionMode.CONCURRENT)>
public class MyTestClass {
    // ...
}

You can enable parallel execution by adding the @Execution annotation to your test class, as shown above.

Advantages of Android Unit Testing

Android unit testing offers several advantages in application development. Firstly, it enhances code reliability by quickly identifying unexpected issues and ensuring that code changes do not impact existing functionality.

Secondly, it makes refactoring safer. If test cases pass, you can be confident that refactoring does not break existing features.

Thirdly, unit testing improves code design. Testable code is more reusable, modular, and has clear interfaces.

Fourthly, it enhances team productivity. Test code helps new team members understand the project and ensures that all team members have a clear understanding of code functionality and goals.

アンドロイドユニットテストのガイド

  1. Androidユニットテストとは?
  2. Androidクラスのモック方法
  3. JUnitテストを高速化する方法
  4. Androidユニットテストの利点

Androidユニットテストとは?

Androidユニットテストは、個々の機能をテストして、アプリケーションの独立した部分が期待通りに動作することを確認するプロセスです。これにより、ソフトウェア開発の初期段階で発生するかもしれないバグを発見して修正するのに役立ちます。また、これはテスト駆動開発(TDD)の重要な部分でもあります。

Androidプラットフォームでは、JUnitなどのテストフレームワークを使用してユニットテストを実行できます。これにより、アプリケーションの各部分が正常に動作するか確認し、機能の追加や変更に伴う潜在的な問題を事前に特定できます。

Androidユニットテストは、コードの品質を向上させ、開発プロセスでメンテナンスを容易にする重要な役割を果たします。

Androidクラスのモック方法

ユニットテストでAndroidクラスをモックすることは非常に重要です。モックオブジェクトを使用すると、実際のオブジェクトを作成せずにそのオブジェクトの動作をシミュレートできます。これにより、テストの複雑さが低減し、テストが効率的になります。

Androidでは、Mockitoなどのライブラリを使用してクラスをモックできます。Mockitoはモックオブジェクトを簡単に作成および管理できる強力なテストフレームワークです。

<dependencies>
  <dependency>
    <groupId>org.mockito</groupId>
    <artifactId>mockito-core</artifactId>
    <version>3.1.0</version>
    <scope>test</scope>
  </dependency>

上記のように、build.gradleファイルにMockitoを追加して使用できます。その後、テストクラスでは@Mockアノテーションを使用してモックオブジェクトを作成できます。

JUnitテストを高速化する方法

JUnitテストの実行速度を向上させることは、開発プロセスをより効率的にします。高速なテストの実行は、コードの変更に対するフィードバックを迅速に受け取ることができ、最終的には開発時間を短縮します。

JUnitテストを高速化する方法の一つは、最小限に必要な設定のみを使用することです。これにより、テストの実行時間が短縮されます。たとえば、データベース接続が不要なテストでは、それを設定しないことが適しています。

もう一つの方法は、テストを並行して実行することです。JUnit 5からは、@Executionアノテーションを使用してテストを並行して実行できます。これにより、テストの実行時間を大幅に短縮できます。

<@Execution(ExecutionMode.CONCURRENT)>
public class MyTestClass {
    // ...
}

上記のように、@Executionアノテーションをテストクラスに追加して並行実行を有効にできます。

Androidユニットテストの利点

Androidユニットテストはアプリケーション開発に多くの利点をもたらします。まず第一に、コードの信頼性を高めます。予期せぬ問題を素早く発見し、コードの変更が既存の機能に影響を与えないことを確認します。

第二に、リファクタリングを安全に行うことができます。テストケースが合格すれば、リファクタリングが既存の機能を壊さなかったことを確信できます。

第三に、ユニットテストはコードの設計を改善します。テスト可能なコードは再利用性が高く、モジュール化が進み、より明確なインターフェースを持っています。

第四に、ユニットテストはチームの生産性を向上させます。テストコードは新しいチームメンバーがプロジェクトを理解するのに役立ちます。また、すべてのチームメンバーがコードの機能と目標を明確に理解できるようにします。

Wednesday, September 20, 2023

Android ADB와 fastboot 설치, 사용법, 활용 방법 총정리

ADB Fastboot에 대한 소개

ADB(Android Debug Bridge)와 Fastboot는 안드로이드 운영 체제와 통신할 수 있는 강력한 도구입니다. 이들은 개발자뿐만 아니라 일반 사용자들에게도 스마트폰이나 태블릿의 다양한 기능을 제어할 수 있는 능력을 제공합니다.

ADB란?

ADB(Android Debug Bridge)는 개발자가 디바이스에 다양한 명령을 전송하고, 애플리케이션을 디버깅하며, 데이터를 전송하는 등의 작업을 할 수 있게 해주는 도구입니다. 이를 통해 개발자는 PC에서 스마트폰으로 파일을 전송하거나, 애플리케이션 설치, 로그 추출 등의 작업을 할 수 있습니다.

Fastboot란?

Fastboot는 ADB와 마찬가지로 안드로이드 디바이스와 컴퓨터 사이에서 통신할 수 있는 프로토콜입니다. 그러나 Fastboot는 보통 부트로더 모드에서 사용되며, 시스템 이미지를 교체하거나 복구 파티션에 접근하는 등의 작업에 주로 사용됩니다.

목차로 돌아가기

ADB Fastboot 설치 방법

ADB와 Fastboot를 사용하기 위해서는 먼저 컴퓨터에 이들을 설치해야 합니다. 이번 장에서는 ADB와 Fastboot의 설치 과정을 안내하겠습니다.

Windows에서의 설치

Windows 사용자들은 Google의 Android SDK Platform-Tools를 통해 ADB와 Fastboot를 쉽게 설치할 수 있습니다. 다음은 간단한 설치 과정입니다:

1. Android SDK Platform-Tools 페이지로 이동합니다.
2. "SDK Platform-Tools for Windows" 링크를 클릭하여 파일을 다운로드합니다.
3. 다운로드 받은 파일을 원하는 위치에 압축 해제합니다.
4. 환경 변수에 압축 해제한 폴더 경로를 추가합니다.

macOS에서의 설치

macOS 사용자들도 비슷한 과정으로 ADB와 Fastboot를 설치할 수 있습니다:

1. Android SDK Platform-Tools 페이지로 이동합니다.
2. "SDK Platform-Tools for Mac" 링크를 클릭하여 파일을 다운로드합니다.
3. Terminal을 열고, 다운로드 폴더로 이동 후 압축 해제 명령어인 'unzip'을 사용해 파일을 압축 해제합니다.
4. 환경 변수에 압춸 해제한 폴더 경로를 추가합니다.
목차로 돌아가기

ADB Fastboot 기본 명령어 사용법

ADB와 Fastboot를 설치한 후에는 다양한 명령어를 통해 안드로이드 디바이스를 제어할 수 있습니다. 이번 장에서는 가장 기본적인 명령어들을 소개하겠습니다.

ADB의 기본 명령어

다음은 ADB에서 자주 사용되는 일부 기본적인 명령어입니다:

adb devices - 연결된 안드로이드 디바이스의 리스트를 보여줍니다.
adb install [파일명] - APK 파일을 디바이스에 설치합니다.
adb pull [디바이스 경로] [PC 경로] - 디바이스의 파일을 PC로 복사합니다.
adb push [PC 경로] [디바이스 경로] - PC의 파일을 디바이스로 복사합니다.

Fastboot의 기본 명령어

다음은 Fastboot에서 자주 사용되는 일부 기본적인 명령어입니다:

fastboot devices - 연결된 안드로이드 디바이스의 리스트를 보여줍니다.
fastboot flash recovery [파일명.img] - 리커버리 이미지를 교체합니다.
fastboot reboot bootloader - 부트 로더 모드에서 재부팅 합니다.
fastboot oem unlock - OEM 잠금 해제, 이 작업은 모든 데이터가 삭제됩니다. 
목차로 돌아가기

자주 발생하는 ADB Fastboot 문제 해결 방법

ADB와 Fastboot를 사용하다 보면 다양한 문제에 부딪힐 수 있습니다. 이번 장에서는 일반적으로 발생할 수 있는 몇 가지 문제와 그 해결 방법을 소개하겠습니다.

"adb is not recognized as an internal or external command"

이 메시지는 ADB가 설치되었지만, 시스템이 해당 도구의 위치를 찾을 수 없을 때 나타납니다. 이 경우 환경 변수에 ADB가 설치된 경로를 추가해야 합니다.

"device not found" 또는 "waiting for device"

이 메시지는 컴퓨터가 안드로이드 디바이스를 인식하지 못할 때 나타납니다. USB 디버깅 옵션이 활성화되어 있는지 확인하고, USB 포트나 케이블의 문제가 아닌지 확인해 보세요.

"FAILED (remote: 'unlock operation is not allowed')"

Fastboot에서 OEM 잠금 해제 작업을 시도할 때 이 메시지가 나타나면, 디바이스 설정에서 OEM 잠금 해제 옵션을 활성화해야 합니다.

목차로 돌아가기

Android ADBとFastBootの完全な初心者向けガイド

ADBとFastbootの紹介

ADB(Android Debug Bridge)とFastbootは、Androidオペレーティングシステムと通信できる強力なツールです。これらは、開発者だけでなく一般ユーザーにも、スマートフォンやタブレットのさまざまな機能を制御する能力を提供します。

ADBとは?

ADB(Android Debug Bridge)は、開発者がデバイスにさまざまなコマンドを送信し、アプリケーションのデバッグ、データの転送などを行うためのツールです。これにより、開発者はPCからスマートフォンにファイルを転送したり、アプリをインストールしたり、ログを抽出したりすることができます。

Fastbootとは?

Fastbootは、ADBと同様にAndroidデバイスとコンピューター間の通信に使用されるプロトコルです。ただし、Fastbootは通常、ブートローダーモードで使用され、システムイメージの交換やリカバリーパーティションへのアクセスなどのタスクに主に使用されます。

目次に戻る

ADBとFastbootのインストール方法

ADBとFastbootを使用するには、まずこれらをコンピュータにインストールする必要があります。この章では、ADBとFastbootのインストール方法について説明します。

Windowsでのインストール

Windowsユーザーは、GoogleのAndroid SDK Platform-Toolsを使用してADBとFastbootを簡単にインストールできます。以下は簡単なインストール手順です:

1. Android SDK Platform-Toolsページに移動します。
2. "SDK Platform-Tools for Windows"リンクをクリックしてファイルをダウンロードします。
3. ダウンロードしたファイルを希望の場所に解凍します。
4. 解凍したフォルダのパスをシステムの環境変数に追加します。

macOSでのインストール

macOSユーザーも似たようなプロセスでADBとFastbootをインストールできます:

1. Android SDK Platform-Toolsページに移動します。
2. "SDK Platform-Tools for Mac"リンクをクリックしてファイルをダウンロードします。
3. ターミナルを開き、ダウンロードフォルダに移動し、'unzip'コマンドを使用してファイルを解凍します。
4. 解凍したフォルダのパスをシステムの環境変数に追加します。
目次に戻る

基本的なADBとFastbootコマンドの使用法

ADBとFastbootをインストールした後、さまざまなコマンドを使用してAndroidデバイスを制御できます。この章では、いくつかの基本的なコマンドを紹介します。

基本的なADBコマンド

以下はADBでよく使用される基本的なコマンドの一部です:

adb devices - 接続されたAndroidデバイスの一覧を表示します。
adb install [ファイル名] - デバイスにAPKファイルをインストールします。
adb pull [デバイスのパス] [PCのパス] - ファイルをデバイスからPCにコピーします。
adb push [PCのパス] [デバイスのパス] - ファイルをPCからデバイスにコピーします。

基本的なFastbootコマンド

以下はFastbootでよく使用される基本的なコマンドの一部です:

fastboot devices - Fastbootモードで接続されたAndroidデバイスの一覧を表示します。
fastboot flash recovery [ファイル名.img] - リカバリイメージを交換します。
fastboot reboot bootloader - ブートローダーモードに再起動します。
fastboot oem unlock - OEMのロックを解除し、すべてのデータが削除されます。 
目次に戻る

一般的なADBとFastbootのトラブルシューティング

ADBとFastbootを使用する際にさまざまな問題に遭遇することがあります。この章では一般的な問題とそれらの解決方法を紹介します。

"adb is not recognized as an internal or external command"

このメッセージは、ADBがインストールされているが、システムがその場所を見つけることができない場合に表示されます。この場合、ADBのパスをシステムの環境変数に追加する必要があります。

"device not found"または"waiting for device"

これらのメッセージは、コンピュータがAndroidデバイスを検出できない場合に表示されます。USBデバッグが有効になっていることを確認し、USBポートやケーブルに問題がないか確認してください。

"FAILED (remote: 'unlock operation is not allowed')"

FastbootでOEMのロックを解除しようとすると、このメッセージが表示される場合、デバイスの設定でOEMのロックを有効にする必要があります。

目次に戻る

How to Use ADB and Fastboot for Android

Introduction to ADB and Fastboot

ADB (Android Debug Bridge) and Fastboot are powerful tools that allow communication with the Android operating system. They provide the ability to control various functions of smartphones and tablets, not only for developers but also for general users.

What is ADB?

ADB (Android Debug Bridge) is a tool that enables developers to send various commands to a device, debug applications, and transfer data. It allows developers to transfer files from a PC to a smartphone, install applications, extract logs, and perform other tasks.

What is Fastboot?

Fastboot, like ADB, is a protocol for communication between Android devices and computers. However, Fastboot is typically used in bootloader mode and is primarily used for tasks such as replacing system images or accessing recovery partitions.

Back to Table of Contents

How to Install ADB and Fastboot

To use ADB and Fastboot, you need to install them on your computer first. This chapter provides instructions on how to install ADB and Fastboot.

Installation on Windows

Windows users can easily install ADB and Fastboot through Google's Android SDK Platform-Tools. Here is a simple installation process:

1. Go to the Android SDK Platform-Tools page.
2. Click the "SDK Platform-Tools for Windows" link to download the files.
3. Extract the downloaded files to the desired location.
4. Add the path to the extracted folder to the system environment variables.

Installation on macOS

macOS users can also install ADB and Fastboot through a similar process:

1. Go to the Android SDK Platform-Tools page.
2. Click the "SDK Platform-Tools for Mac" link to download the files.
3. Open Terminal, navigate to the download folder, and use the 'unzip' command to extract the files.
4. Add the path to the extracted folder to the system environment variables.
Back to Table of Contents

Basic ADB and Fastboot Commands Usage

After installing ADB and Fastboot, you can control Android devices using various commands. This chapter introduces some of the basic commands.

Basic ADB Commands

Here are some commonly used basic commands in ADB:

adb devices - List connected Android devices.
adb install [filename] - Install an APK file on the device.
adb pull [device path] [PC path] - Copy a file from the device to the PC.
adb push [PC path] [device path] - Copy a file from the PC to the device.

Basic Fastboot Commands

Here are some commonly used basic commands in Fastboot:

fastboot devices - List connected Android devices in Fastboot mode.
fastboot flash recovery [filename.img] - Replace the recovery image.
fastboot reboot bootloader - Reboot into bootloader mode.
fastboot oem unlock - Unlock OEM, erasing all data. 
Back to Table of Contents

Common ADB and Fastboot Troubleshooting

While using ADB and Fastboot, you may encounter various issues. This chapter introduces some common problems and their solutions.

"adb is not recognized as an internal or external command"

This message appears when ADB is installed but the system cannot find its location. In this case, you need to add the path to ADB to the system environment variables.

"device not found" or "waiting for device"

These messages appear when the computer cannot detect the Android device. Make sure USB debugging is enabled and check for any issues with the USB port or cable.

"FAILED (remote: 'unlock operation is not allowed')"

If you encounter this message when attempting to unlock OEM in Fastboot, you need to enable OEM unlock in the device settings.

Back to Table of Contents

Wednesday, September 13, 2023

Android AppBar, Toolbar, ActionBar: The Ultimate Guide for Developers

Chapter 1: What is Android's AppBar?

The AppBar is an important interface element in Android applications. It serves the purpose of providing menus and tools necessary for users to interact with the app. Typically, the AppBar is located at the top of the screen and can include various actions such as a search button and settings menu.

The AppBar is created by extending the <androidx.appcompat.widget.Toolbar> class. This class is defined in the layout file using the <Toolbar> tag and is used in the activity through the setSupportActionBar() method.

<androidx.appcompat.widget.Toolbar
    android:id="@+id/my_toolbar"
    android:layout_width="match_parent"
    android:layout_height="?attr/actionBarSize"
    android:background="?attr/colorPrimary"
    app:popupTheme="@style/ThemeOverlay.AppCompat.Light" />

Back to Table of Contents

Chapter 2: Differences Between Toolbar and ActionBar

In Android development, the Toolbar and ActionBar serve similar purposes but differ in usage and customization capabilities.

The Action Bar was introduced in Android 3.0 (Honeycomb) as a UI element to represent the state of the application and perform key actions for the app or specific screens. The ActionBar can include elements such as the app name, navigation menu, and search.

<androidx.appcompat.app.ActionBar actionBar = getSupportActionBar();>
actionBar.setDisplayHomeAsUpEnabled(true);
</androidx.appcompat.app.ActionBar>

On the other hand, the Toolbar was introduced in Android 5.0 (Lollipop) and has been preferred by many developers since then. It is more flexible and easier to customize. The Toolbar inherently has all the features of the ActionBar but offers more freedom in terms of positioning and appearance.

<androidx.appcompat.widget.Toolbar myToolbar = (Toolbar) findViewById(R.id.my_toolbar);
setSupportActionBar(myToolbar);>
myToolbar.setTitle("My App");
myToolbar.setSubtitle("Welcome");
</androidx.appcompat.widget.Toolbar>

Back to Table of Contents

Chapter 3: Understanding AppBarLayout

AppBarLayout is a frequently used component in Android apps that follow Material Design guidelines. It is a specialized form of Vertical LinearLayout that assists child views (e.g., Toolbar) in interacting with each other while scrolling.

With AppBarLayout, you can implement behaviors such as expanding or collapsing the app bar along with scrolling, which enhances the user experience (UX).

<com.google.android.material.appbar.AppBarLayout
    android:layout_width="match_parent"
    android:layout_height="wrap_content"
    android:theme="@style/ThemeOverlay.AppCompat.Dark.ActionBar">

    <androidx.appcompat.widget.Toolbar
        android:id="@+id/my_toolbar"
        android:layout_width="match_parent"
        android:layout_height="?attr/actionBarSize"
        app:popupTheme="@style/ThemeOverlay.AppCompat.Light" />

</com.google.android.material.appbar.AppBarLayout>

As seen in the code above, you can place a Toolbar inside AppBarLayout to create a UI that interacts seamlessly.

Back to Table of Contents

Chapter 4: Recommendations for Toolbar and ActionBar

Toolbar and ActionBar are crucial interface elements in Android applications and greatly influence the user experience (UX). Therefore, it's important to use them correctly, and here are some recommendations:

1. Set Appropriate Titles

The titles displayed in the Toolbar or ActionBar should accurately reflect the functionality and content of the current screen. This helps users understand where they are within the app.

2. Include Only Necessary Menus

Including too many menu items can make it difficult for users to find the desired functionality. Therefore, it's advisable to include only the most important or frequently used features in the AppBar and hide the rest in the overflow menu (three-dot button).

3. Maintain Consistent Positioning

The position of the Action Bar or Toolbar should remain consistent throughout the app. This ensures that users experience a predictable UI, enhancing intuitive usability.

4. Adhere to Material Design Guidelines

The Material Design guidelines provide excellent recommendations for AppBar design and interaction, among other aspects. Adhering to these guidelines ensures a high-quality UX.

Back to Table of Contents

안드로이드 개발자를 위한 AppBar, Toolbar, ActionBar 가이드

1장: Android의 AppBar란?

AppBar는 Android 애플리케이션에서 중요한 인터페이스 요소입니다. 사용자가 앱과 상호작용하는 데 필요한 메뉴와 도구를 제공하는 역할을 합니다. AppBar는 주로 화면 상단에 위치하며, 검색 버튼, 설정 메뉴 등 다양한 액션을 포함할 수 있습니다.

AppBar는 <androidx.appcompat.widget.Toolbar> 클래스를 확장하여 만들어집니다. 이 클래스는 레이아웃 파일에서 <Toolbar> 태그로 정의되며, 액티비티에서 setSupportActionBar() 메서드를 통해 사용됩니다.

<androidx.appcompat.widget.Toolbar
    android:id="@+id/my_toolbar"
    android:layout_width="match_parent"
    android:layout_height="?attr/actionBarSize"
    android:background="?attr/colorPrimary"
    app:popupTheme="@style/ThemeOverlay.AppCompat.Light" />

목차로 돌아가기

2장: Toolbar와 ActionBar의 차이

Android 개발에서 ToolbarActionBar는 비슷한 역할을 하지만, 사용 방법과 커스터마이징 가능성에서 차이가 있습니다.

Action Bar은 Android 3.0(Honeycomb)부터 도입된 UI 요소로, 애플리케이션의 상태를 나타내고 애플리케이션 또는 화면별 주요 작업을 수행하는 데 사용됩니다. ActionBar는 앱 이름, 네비게이션 메뉴, 검색 등 다양한 요소를 포함할 수 있습니다.

<androidx.appcompat.app.ActionBar actionBar = getSupportActionBar();>
actionBar.setDisplayHomeAsUpEnabled(true);
</androidx.appcompat.app.ActionBar>

Toolbar, 반면에 Android 5.0(Lollipop)에서 도입되었으며 이후로 많은 개발자들 사이에서 선호되고 있습니다. 이유는 더욱 유연하고 커스터마이징하기 쉽기 때문입니다. Toolbar는 기본적으로 ActionBar의 모든 기능을 가지고 있지만 위치나 모양 등을 자유롭게 변경할 수 있다는 점에서 차별화됩니다.

<androidx.appcompat.widget.Toolbar myToolbar = (Toolbar) findViewById(R.id.my_toolbar);
setSupportActionBar(myToolbar);>
myToolbar.setTitle("My App");
myToolbar.setSubtitle("Welcome");
</androidx.appcompat.widget.Toolbar>

목차로 돌아가기

3장: AppBarLayout 이해하기

AppBarLayout은 Material Design 가이드라인을 따르는 Android 앱에서 자주 사용되는 컴포넌트입니다. AppBarLayout은 Vertical LinearLayout의 특수한 형태로, 자식 뷰(예를 들어, Toolbar)가 서로 상호작용하면서 스크롤되도록 도와줍니다.

AppBarLayout을 사용하면, 앱 바가 스크롤과 함께 확장되거나 축소되는 등의 동작을 구현할 수 있습니다. 이런 동작들은 사용자 경험(UX)를 향상시키는데 큰 역할을 합니다.

<com.google.android.material.appbar.AppBarLayout
    android:layout_width="match_parent"
    android:layout_height="wrap_content"
    android:theme="@style/ThemeOverlay.AppCompat.Dark.ActionBar">

    <androidx.appcompat.widget.Toolbar
        android:id="@+id/my_toolbar"
        android:layout_width="match_parent"
        android:layout_height="?attr/actionBarSize"
        app:popupTheme="@style/ThemeOverlay.AppCompat.Light" />

</com.google.android.material.appbar.AppBarLayout>

위 코드에서 볼 수 있듯이, AppBarLayout 내부에 Toolbar를 배치하여 상호 작용하는 UI를 구성할 수 있습니다.

목차로 돌아가기

4장: Toolbar와 ActionBar의 권장사항

Toolbar와 ActionBar는 Android 애플리케이션에서 중요한 인터페이스 요소로, 사용자 경험(UX)을 크게 좌우합니다. 그렇기 때문에 이들을 올바르게 사용하는 것이 중요하며, 아래에 몇 가지 권장 사항을 제시합니다.

1. 적절한 제목 설정

Toolbar 또는 ActionBar에 표시되는 제목은 현재 화면의 기능과 내용을 정확하게 반영해야 합니다. 사용자가 앱 내에서 어디에 있는지를 명확하게 인식할 수 있도록 도와줍니다.

2. 필요한 메뉴만 포함

너무 많은 메뉴 항목이 포함되면 사용자가 원하는 기능을 찾기 어렵습니다. 따라서 가장 중요하거나 자주 사용되는 기능만 AppBar에 포함시키고, 나머지는 오버플로우 메뉴(세 점 버튼) 안에 숨겨 두는 것이 좋습니다.

3. 일관된 위치 유지

Action Bar나 Toolbar의 위치를 앱 전체에서 일관되게 유지해야 합니다. 이것은 사용자가 예상 가능한 UI를 경험하도록 하여 직관적인 조작성을 보장합니다.

4. Material Design 가이드라인 준수

Material Design 가이드라인은 AppBar 디자인과 상호작용 방식 등 다양한 면에서 훌륭한 지침을 제공합니다. 이를 준수하여 고품질의 UX를 제공하세요.

목차로 돌아가기

開発者のためのAndroidのAppBar、Toolbar、ActionBarガイド

第1章: AndroidのAppBarとは?

AppBarはAndroidアプリケーションにおいて重要なインターフェース要素です。ユーザーがアプリと対話するために必要なメニューやツールを提供する役割を果たします。AppBarは通常、画面の上部に配置され、検索ボタンや設定メニューなどさまざまなアクションを含むことができます。

AppBarは<androidx.appcompat.widget.Toolbar>クラスを拡張して作成されます。このクラスはレイアウトファイルで<Toolbar>タグを使用して定義され、アクティビティではsetSupportActionBar()メソッドを使用しています。

<androidx.appcompat.widget.Toolbar
    android:id="@+id/my_toolbar"
    android:layout_width="match_parent"
    android:layout_height="?attr/actionBarSize"
    android:background="?attr/colorPrimary"
    app:popupTheme="@style/ThemeOverlay.AppCompat.Light" />

目次に戻る

第2章: ToolbarとActionBarの違い

Android開発において、ToolbarActionBarは似た役割を果たしますが、使用方法とカスタマイズ可能性に違いがあります。

Action BarはAndroid 3.0(ハニカム)から導入されたUI要素で、アプリケーションの状態を表し、アプリケーションまたは画面ごとの主要な操作を実行するために使用されます。ActionBarにはアプリ名、ナビゲーションメニュー、検索などさまざまな要素が含まれることがあります。

<androidx.appcompat.app.ActionBar actionBar = getSupportActionBar();>
actionBar.setDisplayHomeAsUpEnabled(true);
</androidx.appcompat.app.ActionBar>

一方、ToolbarはAndroid 5.0(ロリポップ)以降に導入され、以降の多くの開発者に支持されています。これはより柔軟でカスタマイズが容易です。ToolbarはActionBarのすべての機能を持っていますが、位置や外観などを自由に変更できる点で異なります。

<androidx.appcompat.widget.Toolbar myToolbar = (Toolbar) findViewById(R.id.my_toolbar);
setSupportActionBar(myToolbar);>
myToolbar.setTitle("My App");
myToolbar.setSubtitle("Welcome");
</androidx.appcompat.widget.Toolbar>

目次に戻る

第3章: AppBarLayoutの理解

AppBarLayoutはMaterial Designガイドラインに従うAndroidアプリでよく使用されるコンポーネントです。AppBarLayoutはVertical LinearLayoutの特別な形態で、子ビュー(例:Toolbar)がスクロール時に相互作用するのをサポートします。

AppBarLayoutを使用すると、アプリバーがスクロールとともに展開または収縮するなどの動作を実装できます。これらの動作はユーザーエクスペリエンス(UX)を向上させるのに役立ちます。

<com.google.android.material.appbar.AppBarLayout
    android:layout_width="match_parent"
    android:layout_height="wrap_content"
    android:theme="@style/ThemeOverlay.AppCompat.Dark.ActionBar">

    <androidx.appcompat.widget.Toolbar
        android:id="@+id/my_toolbar"
        android:layout_width="match_parent"
        android:layout_height="?attr/actionBarSize"
        app:popupTheme="@style/ThemeOverlay.AppCompat.Light" />

</com.google.android.material.appbar.AppBarLayout>

上記のコードでは、AppBarLayout内にToolbarを配置して、スムーズに相互作用するUIを作成できます。

目次に戻る

第4章: ToolbarとActionBarの推奨事項

ToolbarとActionBarはAndroidアプリケーションにおいて重要なインターフェース要素であり、ユーザーエクスペリエンス(UX)に大きな影響を与えます。そのため、これらを正しく使用することが重要であり、以下はいくつかの推奨事項です:

1. 適切なタイトルの設定

ToolbarまたはActionBarに表示されるタイトルは、現在の画面の機能と内容を正確に反映する必要があります。これはユーザーがアプリ内でどこにいるかを理解するのに役立ちます。

2. 必要なメニューのみを含める

多くのメニューアイテムを含めると、ユーザーが求める機能を見つけるのが難しくなります。そのため、AppBarには最も重要なまたは頻繁に使用される機能のみを含め、残りはオーバーフローメニュー(三点ボタン)に隠すことが良いでしょう。

3. 一貫した配置を維持する

Action BarまたはToolbarの位置はアプリ全体で一貫して維持する必要があります。これにより、ユーザーは予測可能なUIを経験し、直感的な操作性が確保されます。

4. Material Designガイドラインに従う

Material Designガイドラインは、AppBarのデザインや対話方法など、さまざまな側面で優れたガイダンスを提供しています。これに従うことで高品質のUXを提供できます。

目次に戻る

Wednesday, September 6, 2023

ADBサーバーバージョン(41)とクライアント(40)の不一致エラーの修正方法

時々、ADBサーバーとクライアントのバージョンが一致しないためにエラーが発生するユーザーがいます。この問題は、言葉通り、ADBのバージョンが一致しないことから起こります。

私の場合は、スムーズに使用していたところ突然このエラーが発生し、解決するまでに時間を要しました。参考までに私のオペレーティングシステムはMacです。

解決方法

結論から言うと、brewを通じてインストールしたADBがAndroid Studioからインストールしたものと競合していました。この問題を解決するためには、brewを通じてインストールしたADBをアンインストールし環境変数を再設定すればよいです。

追加情報

初めはバージョンが同じだったため問題なく動作していましたが、Android Studioで最新バージョンへ常に更新されるようになってから突然エラーが始まったようです。

同様の問題を経験している方々へ上記方法で問題解決を試みてみてください。

How to Fix the ADB Server Version (41) and Client (40) Mismatch Error

Sometimes, users may encounter an error caused by a mismatch between the ADB server and client versions. As the message implies, this problem arises from incompatible ADB versions.

In my case, I was using it smoothly when suddenly this error occurred, and it took some time to resolve. For reference, my operating system is Mac.

Solution

In conclusion, the ADB installed via brew conflicted with the one installed from Android Studio. To resolve this issue, you need to uninstall the ADB installed via brew and reset your environment variables.

Additional Information

This sudden error seemed to have started after Android Studio kept updating to the latest version even though it initially worked without problems due to having identical versions.

If you are experiencing a similar problem, I recommend trying out this solution method.

Tuesday, September 5, 2023

JsoupとGlide 4.0を使用したHTMLページ内の画像解析とリスト表示

Android開発向け無料画像抽出プロジェクトの説明

この記事では、Android開発向けの無料画像を抽出するプロジェクトについて説明します。このプロジェクトは以前、私の前の会社の面接課題として実施されました。任意のウェブサイトから画像を抽出するプロジェクトでしたが、著作権の問題から、無料の画像を提供するウェブサイトであるPixabayを使用してプロジェクトを実施しました。

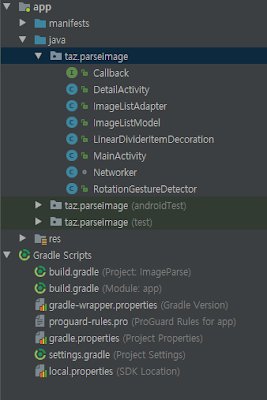
Androidソースアーキテクチャ
ソースアーキテクチャ

プロジェクトのメインフロー

Pixabayから無料の画像を抽出するために使用されるAndroidアプリの主要な動作フローは次のとおりです:

  1. MainActivity: リストを構築し、Callbackインターフェースを実装し、次にJsoupを使用してNetworkerにネットワーク通信を要求します。
  2. Networker: 受信したリクエストをJsoupで処理し、画像情報を解析し、ImageListModelの形式でリストを構築します。その後、リストを要求元のCallback(MainActivity)に転送します。
  3. MainActivity: リストデータを受け取り、更新します。

Pixabayからの画像情報の抽出

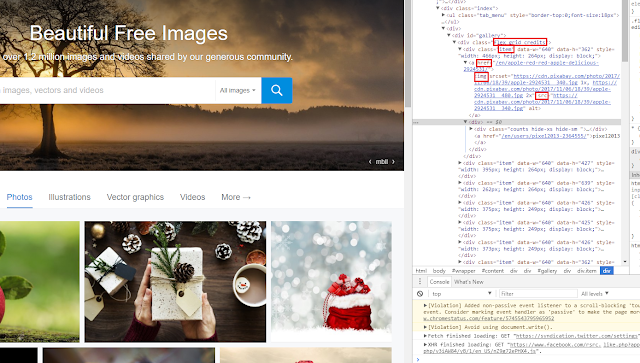
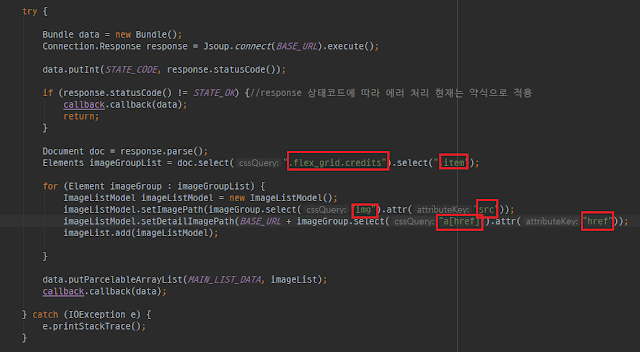
Pixabayから必要な画像情報を取得するために、最初にChromeデベロッパーモードでimgタグの情報を特定し、次にJsoupを使用して解析しました。

Chromeデベロッパーモードのスクリーンショット
Networkerコードのスクリーンショット
Networkerのコードの例

画面の回転処理の実装

このプロジェクトでは、画面の回転を処理するオプションを実装しました。この機能は、AndroidManifestファイルのアクティビティオプションに「android:configChanges="screenSize|orientation"」を追加して画面サイズまたは方向の変更を自動的に処理するように設定されています。

Glideを使用した画像の読み込み

画像の読み込みにはGlideライブラリを使用しました。Glide 3.0と4.0の使用方法が異なるため、このプロジェクトではプレースホルダーとエラー画像の表示を適用しました。

Glide 4.0のプレースホルダーとエラー画像のコード
Glide 4.0のプレースホルダーとエラー画像の例

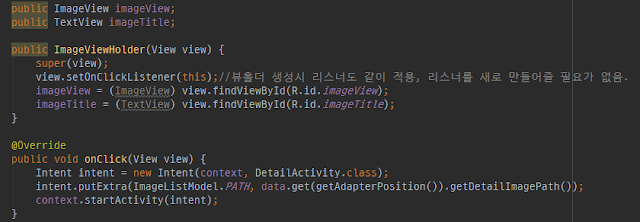
RecyclerViewでのOnClickListenerの設定

さらに、RecyclerViewのOnClickListenerをonBindViewHolderではなくViewHolderの作成時に設定しました。

RecyclerViewでViewHolderのリスナーを設定する例

Pixabayサイトの遅延読み込み

Pixabayサイトは画像の最適化のために遅延読み込みを使用しています。これにより、途中で画像を要求すると画像の読み込みエラーが発生することがあります。この問題は例外処理を実装せずにそのまま放置しました。

サンプルソースコードのダウンロード

以下のリンクをクリックすると、このプロジェクトのサンプルソースコードをダウンロードできます:

サンプルソースコードのダウンロード

Image Parsing and List Display within HTML Pages Using Jsoup and Glide 4.0

Explaining a Free Image Extraction Project for Android Development

In this article, I will describe a project for extracting free images for Android development. This project was previously undertaken as an interview assignment for my previous company. It involved extracting images from arbitrary websites, but due to copyright concerns, I conducted the project using the website Pixabay, which offers free images.

Android Source Architecture
Source Architecture

Main Flow of the Project

The primary operational flow of the Android app used for extracting free images from Pixabay is as follows:

  1. MainActivity: Constructs a list and implements a Callback interface, then requests network communication using Jsoup to the Networker.
  2. Networker: Processes the received request with Jsoup, parses image information, and constructs a list in the form of ImageListModel. It then forwards the list to the requesting Callback (MainActivity).
  3. MainActivity: Receives the list data and updates it.

Extracting Image Information from Pixabay

To obtain the necessary image information from Pixabay, I first identified the img tag's information in Chrome Developer Mode and then used Jsoup for parsing.

Chrome Developer Mode Screenshot
Networker Code Screenshot
Networker Code Example

Implementing Screen Rotation Handling

In this project, I implemented an option to handle screen rotation. This feature was configured to automatically handle screen size or orientation changes by adding 'android:configChanges="screenSize|orientation"' to the activity options in the AndroidManifest file.

Loading Images Using Glide

I used the Glide library for image loading. Since the usage of Glide 3.0 and 4.0 differs, I applied placeholder and error image display in this project.

Glide 4.0 Placeholder and Error Image Code
Glide 4.0 Placeholder and Error Image Example

Setting OnClickListener in RecyclerView

Additionally, I set the listener in the ViewHolder creation rather than in onBindViewHolder for RecyclerView.

Setting ViewHolder Listener in RecyclerView

Pixabay Site's Lazy Loading

The Pixabay site uses lazy loading for image optimization. This can sometimes lead to errors in image loading when images are requested partway through. I left this issue unhandled without implementing exception handling.

Download the Example Source Code

If you click the link below, you can download the example source code for this project:

Download Example Source Code

Friday, September 1, 2023

Androidアプリ状態の確認:実行中またはフォアグラウンド判断コード


FCM(Firebase Cloud Messaging)の開発中、アプリが実行中かどうかを判別するための論理が必要でした。しかし、アプリの実行状態を区別するのは私の視点からはかなり難しいことでした。
そのため、状態のチェックを比較的容易に行えるように、以下のコードを作成しました。同様の考慮事項に直面している他の人もいるかもしれないと思い、共有します。

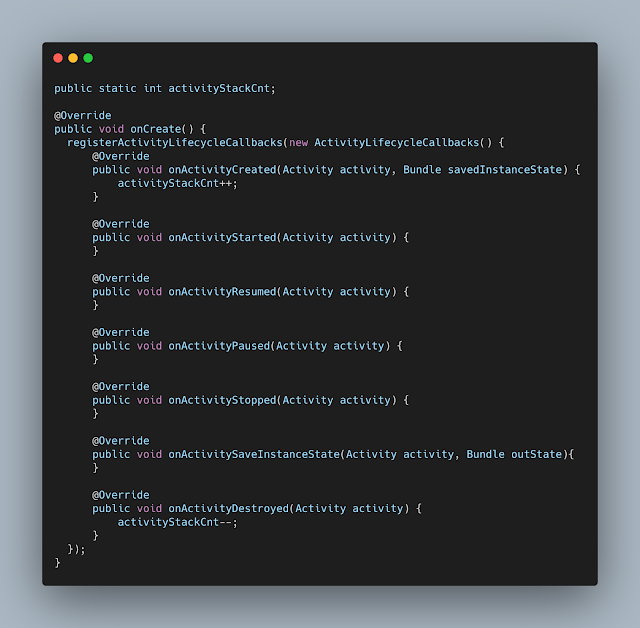
android activity stack check

Applicationを継承したクラスで、onCreateメソッド内に上記のように記述できます。

activityStackCnt > 0 の場合、フォアグラウンドです。
activityStackCnt == 0 の場合、バックグラウンドです。
これが判別方法です。

実際、アプリが適切にバックボタンを押して閉じられると、カウントがマイナスになり、activityStackCnt == 0 になると考えて設計しました。しかし、静的に宣言されたactivityStackCntは、intのデフォルト値である0で初期化されるため、(偶然か?)任意の画面からタスクを終了してメモリをクリアしても正常に動作しました。

Android App Status Check: Code to Identify Running State


During the development of FCM (Firebase Cloud Messaging), I needed logic to determine whether the app was running or not. The problem was that distinguishing the app's execution state proved to be quite tricky from my perspective.
So, I created the following code to make state checks relatively easy. I thought there might be others who face similar considerations, so I'm sharing it.
android activity stack check

In the class that inherits from Application, you can write as shown above in the onCreate method.

If activityStackCnt > 0, it's foreground,
If activityStackCnt == 0, it's background,
This is how you can distinguish it.

In fact, I designed it with the thought that if the app is properly closed by pressing the back button, the count would become negative, resulting in activityStackCnt == 0. However, because the statically declared activityStackCnt is initialized with the default value of 0 for an int, it worked (by chance?) even when the memory was cleared by killing the task from any screen.

Wednesday, August 30, 2023

안드로이드 앱 개발자를 위한 필수 도구, 크래시 리포팅 툴 비교!

제1장: 안드로이드 크래시 리포팅 소개

모바일 애플리케이션 개발 분야에서 애플리케이션의 안정성과 신뢰성을 유지하는 것은 중요합니다. 특히 안드로이드 애플리케이션의 경우 다양한 기기와 운영 체제로 인해 예기치 않은 충돌과 오류가 발생할 수 있습니다. 이 때, 안드로이드 크래시 리포팅 도구가 필요합니다.

안드로이드 크래시 리포팅 도구는 개발자가 자신의 안드로이드 애플리케이션에서 발생하는 충돌을 추적하고 해결하는 데 도움을 주는 소프트웨어 유틸리티입니다. 이들은 충돌이 발생하기 직전의 상황에 대한 자세한 보고서를 제공하며, 기기 정보, 운영 체제 버전 및 충돌 발생 시 스택 트레이스에 대한 정보를 포함합니다. 이를 통해 개발자는 충돌 패턴을 식별하고 그 원인을 정확히 파악하여 효율적으로 해결할 수 있습니다.

안드로이드 개발자를 위한 다양한 유형의 크래시 리포팅 도구가 있습니다. 일부는 앱의 코드베이스에 통합할 수 있는 독립형 도구이고, 다른 일부는 사용자 참여 추적, 네트워크 요청 모니터링 또는 앱 사용 데이터 분석과 같은 기능도 포함한 더 큰 애플리케이션 성능 관리(APM) 솔루션의 일부입니다.

어떤 유형을 선택하더라도 크래시 리포팅 도구를 개발 프로세스에 통합하면 앱의 안정성과 사용자 만족도를 크게 향상시킬 수 있습니다. 또한 디버깅 프로세스의 많은 부분을 자동화하여 시간과 노력을 절약할 수 있습니다.

예시:
Firebase Crashlytics는 네이티브 안드로이드 앱 뿐만 아니라 Flutter 또는 React Native를 사용하여 개발한 크로스 플랫폼 앱에 대한 실시간 크래시 리포팅을 제공하는 도구 중 하나입니다. Firebase Crashlytics를 앱의 코드베이스에 통합하면 개발자는 발생하는 크래시에 대한 자세한 보고서와 함께 실시간으로 알림을 받습니다.

Crashlytics 보고서에는 다음과 같은 내용이 포함됩니다:
- 자세한 스택 트레이스
- 충돌이 발생한 스레드가 UI 작업을 수행했는지 여부
- % 사용자 영향 등 핵심 측면을 강조하는 전체 요약 뷰

Firebase Crashlytics의 작동 방식에 대한 자세한 내용은 다음 링크에서 확인할 수 있습니다: Firebase 공식 문서. 다음 장에서는 Firebase Crashlytics를 포함하여 여러 인기 있는 안드로이드 크래시 리포팅 도구를 비교해보겠습니다. 계속해서 주목해주세요!

제2장: 안드로이드 개발에서 크래시 리포팅 도구의 중요성

빠른 속도로 진행되는 모바일 앱 개발에서 우수한 사용자 경험을 제공하는 것은 중요합니다. 충돌과 오류는 사용자 경험을 방해할 뿐만 아니라 Google Play 스토어에서의 앱 평가와 리뷰에도 부정적인 영향을 미칩니다. 이로 인해 사용자 유지율이 감소하고 앱의 전반적인 성공에도 영향을 미칠 수 있습니다. 따라서 이러한 문제를 신속하게 식별하고 해결하는 것은 중요하며, 여기서 안드로이드 크래시 리포팅 도구가 중요한 역할을 합니다.

안드로이드 개발에서 크래시 리포팅 도구의 중요성을 설명하는 몇 가지 주요 이유는 다음과 같습니다:

  • 실시간 오류 추적: 이러한 도구는 크래시가 발생하면 실시간 업데이트를 제공합니다. 이를 통해 더 많은 사용자가 동일한 문제를 겪기 전에 개발자가 빠르게 대응할 수 있습니다.
  • 자세한 크래시 로그: 이들은 기기 정보, 운영 체제 버전, 스택 트레이스 등을 포함한 포괄적인 크래시 보고서를 제공하며, 개발자가 크래시 패턴과 원인을 식별하는 데 도움을 줍니다.
  • 리소스 할당 개선: 어떤 버그가 사용자 경험에 가장 큰 피해를 줄 수 있는지 파악함으로써 그 버그를 가장 먼저 수정할 수 있습니다.
  • 사용자 만족도: 결국 크래시를 줄이면 사용자 만족도가 향상되어 Google Play 스토어에서의 평가가 높아질 수 있으며, 이는 앱의 성공에 직접적인 영향을 미칠 수 있습니다.
예시:
예를 들어, 결제 과정 중에 안드로이드 11을 실행하는 특정 기기에서 빈번히 충돌하는 전자 상거래 앱이 있다고 가정해보겠습니다. 크래시 리포팅 도구 없이는 사용자가 직접 문제를 보고하지 않는 한 개발자가 이 문제에 대해 알아채는 것은 거의 불가능합니다.

하지만 코드베이스에 Instabug나 Bugsnag와 같은 도구를 통합하면 개발자는 즉시 이러한 크래시에 대한 알림과 자세한 보고서를 받을 수 있습니다. 그럼으로써 개발자는 이러한 문제를 빠르게 해결하여 모든 사용자에게 원활한 결제 과정을 제공하고 쇼핑 경험을 향상시킬 수 있습니다.

요약하면, 안드로이드 크래시 리포팅 도구는 앱의 건강을 조기에 감지하여 원활한 사용자 경험을 제공하는 중요한 역할을 합니다. 성공적인 모바일 애플리케이션에 필수적입니다. 다음 장에서는 특히 Firebase Crashlytics와 비교하여 여러 인기 있는 안드로이드 크래시 리포팅 도구를 자세히 살펴보겠습니다. 계속해서 주목해주세요!

제3장: 다양한 안드로이드 크래시 리포팅 도구 비교

안드로이드 개발자를 위한 다양한 크래시 리포팅 도구가 있습니다. 각 도구마다 독특한 기능, 장단점이 있습니다. 이 장에서는 가장 인기 있는 몇 가지 도구인 Firebase Crashlytics, Instabug, Bugsnag 및 Sentry를 비교해보겠습니다.

Firebase Crashlytics

Firebase Crashlytics는 가볍지만 강력한 실시간 크래시 리포터로, 앱 품질을 해치는 안정성 문제를 추적, 우선순위 지정 및 해결하는 데 도움을 줍니다. 스택 트레이스와 기기 메트릭을 포함한 자세한 크래시 보고서를 제공합니다. 또한 무료로 제공되어 많은 개발자에게 매력적인 선택지가 됩니다.

Instabug

Instabug는 포괄적인 버그 및 크래시 보고서와 사용자 피드백을 한 곳에서 제공합니다. 네트워크 요청 로그와 함께 자세한 오류 로그도 제공하며, 복잡한 문제의 디버깅에 매우 유용할 수 있습니다. 그러나 Firebase Crashlytics와 달리 무료로 사용할 수 없지만 기본 무료 플랜도 제공합니다.

Bugsnag

Bugsnag는 자동 안드로이드 크래시 리포팅뿐만 아니라 ANR(응용 프로그램 응답 없음 오류)를 감지하는 것과 같은 적극적인 애플리케이션 건강 모니터링 기능도 제공합니다. React Native 또는 Flutter를 사용하여 개발한 네이티브 안드로이드 앱과 크로스 플랫폼 앱을 모두 지원합니다.

Sentry

Sentry는 코드의 정확한 위치와 함께 스택에서 발생하는 모든 크래시를 실시간으로 보여주는 오픈 소스 오류 추적 도구입니다. 새로운 크래시에 대한 이메일 알림도 포함됩니다. Bugsnag와 마찬가지로 네이티브 안드로이드 앱 외에도 다양한 플랫폼을 지원합니다.

비교 표:

| 도구                | 실시간 리포팅 | 자세한 오류 로그 | 네트워크 요청 로그 | 가격   |
|:-------------------:|:-------------:|:---------------:|:----------------:|-------|
| Firebase Crashlytics | 예            | 예             | 아니오            | 무료   |
| Instabug             | 예            | 예             | 예                | 무료 및 유료 |
| Bugsnag              | 예            | 예             | 아니오            | 유료   |
| Sentry               | 예            | 예             | 아니오            | 유료   |

참고:
이 비교 표는 글 작성 시점(2023년 8월)에서 이러한 도구가 제공하는 기능을 기반으로 작성되었으며, 이러한 회사들이 오퍼링을 업데이트하는 경우 시간이 지남에 따라 변경될 수 있습니다.

다음 장에서는 특히 앱에 적합한 올바른 크래시 리포팅 도구를 선택하는 방법에 대해 논의하겠습니다. 계속해서 주목해주세요!

제4장: 앱에 적합한 올바른 도구 선택 방법

Android 앱에 적합한 올바른 크래시 리포팅 도구를 선택하는 것은 다양한 옵션이 있기 때문에 어려운 작업일 수 있습니다. 그러나 정보를 충분히 고려하여 결정하는 것은 특정 요구 사항과 제약 사항과 일치하는 다양한 요소를 고려하는 것을 의미합니다. 다음은 고려해야 할 주요 요소입니다:

  • 기능: 각 도구마다 다른 기능을 제공합니다. 일부 도구는 자세한 크래시 리포트를 제공하며, 다른 도구는 네트워크 로그나 사용자 피드백 기능도 포함할 수 있습니다. 필요한 기능 목록을 작성하고 해당 기능을 제공하는 도구를 선택하십시오.
  • 예산: Firebase Crashlytics와 같은 일부 도구는 무료이지만 다른 도구는 사용량이나 사용자 수에 따라 가격이 책정될 수 있습니다. 예산을 결정하고 그에 맞게 선택하십시오.
  • 통합의 용이성: 도구를 기존 코드베이스에 통합하기가 얼마나 쉬운지 확인하십시오. 일부 도구는 코드에 상당한 변경이 필요할 수 있어 시간이 많이 걸릴 수 있습니다.
  • 플랫폼 지원: Flutter나 React Native를 사용하여 크로스 플랫폼 앱을 개발하는 경우 해당 도구가 이러한 플랫폼을 지원하는지 확인하십시오.
예시:
예산이 제한된 스타트업이 기본적인 크래시 리포팅 솔루션을 찾고 있다면 Firebase Crashlytics는 견고한 기능을 제공하면서도 비용이 들지 않는 이상적인 선택일 것입니다.

반면에 결제 실패 관련 문제를 디버깅하는 데 네트워크 요청 로그가 도움이 되는 대규모 전자 상거래 앱을 개발하고 있다면 비용이 발생하더라도 Instabug가 더 적합할 것입니다.

앱에 적합한 Android 크래시 리포팅 도구를 선택하는 것은 일반적인 해결책이 아닙니다. 개별적인 요구 사항과 제약 사항에 따라 다릅니다. 다음 장에서는 Android 크래시 리포팅 도구에 대한 토론을 마무리하겠습니다. 계속해서 주목해주세요!

제5장: 결론과 마무리

결론적으로, Android 크래시 리포팅 도구는 앱 개발 과정의 필수 요소입니다. 이들 도구는 사용자 경험과 앱의 성공에 큰 영향을 미칠 수 있는 충돌을 추적, 우선순위 지정 및 해결하는 데 도움을 줍니다. 독특한 기능 세트와 가격을 가진 여러 도구가 있습니다.

Firebase Crashlytics, Instabug, Bugsnag 및 Sentry와 같은 일부 인기 도구를 비교하였습니다. Firebase Crashlytics는 강력한 기능을 제공하면서도 무료로 제공되어 예산이 제한된 스타트업이나 개인 개발자에게 매력적인 선택지입니다. Instabug나 Bugsnag와 같은 유료 옵션은 네트워크 요청 로그나 적극적인 애플리케이 션 건강 모니터링과 같은 추가 기능을 제공합니다.

앱에 가장 적합한 도구를 선택할 때는 기능, 예산, 통합의 용이성 및 플랫폼 지원과 같은 요소를 고려해야 합니다. 각 도구의 데모 버전을 사용하여 테스트하고 어떤 도구가 앱의 특정 요구 사항을 가장 잘 충족시키는지 확인하는 것이 좋습니다.

Android 크래시 리포팅 도구를 효과적으로 활용하면 앱의 안정성을 향상시키고 사용자 만족도를 높일 수 있습니다. 따라서 개발 프로세스에 이러한 도구를 통합하여 앱의 성공을 도모하는 것이 중요합니다. 이제 여러분은 Android 앱의 안정성을 향상시키기 위해 적합한 크래시 리포팅 도구를 선택하고 활용하는 데 필요한 정보를 보유하고 있습니다.

이 글이 여러분의 Android 앱 개발에 도움이 되길 바랍니다. 감사합니다!

Essential Android Crash Reporting Tools for Developers!

Chapter 1: Introduction to Android Crash Reporting

In the world of mobile application development, maintaining the stability and reliability of your application is paramount. This is especially true in the case of Android applications, where a wide variety of devices and operating systems can lead to unexpected crashes and errors. That's where Android Crash Reporting Tools come into play.

Android Crash Reporting Tools are software utilities that help developers track and fix crashes in their Android applications. They provide detailed reports about the circumstances leading up to a crash, including information about the device, operating system version, and stack trace at the time of the crash. This allows developers to identify patterns in crashes, pinpoint their causes, and ultimately fix them more efficiently.

There are many different types of crash reporting tools available for Android developers. Some are standalone tools that you can integrate into your app's codebase; others are part of larger application performance management (APM) solutions that also include features for tracking user engagement, monitoring network requests, or analyzing app usage data.

Regardless of which type you choose to use, integrating a crash reporting tool into your development process can greatly improve your app's stability and user satisfaction. It can also save you considerable time and effort by automating much of the debugging process.

Example: 
Firebase Crashlytics is one such tool that provides real-time crash reporting for both native Android apps as well as cross-platform apps developed using Flutter or React Native. With Firebase Crashlytics integrated into an app's codebase,
developers get notified about crashes as they happen with detailed reports.

Crashlytics report includes:
- Detailed stack traces
- Information on whether the crashed thread was doing UI work
- A full summary view highlighting key aspects like %age users affected etc.

For more details on how Firebase Crashlytics works check out this link: Firebase Official Documentation. In upcoming chapters we will compare several popular android crash reporting tools including Firebase Crashlytics so stay tuned!

Chapter 2: Importance of Crash Reporting Tools in Android Development

In the fast-paced world of mobile app development, delivering a high-quality user experience is crucial. Crashes and errors not only disrupt the user experience but also negatively impact your app's ratings and reviews on the Google Play Store. This can lead to a decrease in user retention and overall success of your app. Hence, identifying and resolving these issues promptly is essential, and that's where Android Crash Reporting Tools prove to be indispensable.

Here are some key reasons why crash reporting tools are important in Android development:

  • Real-time error tracking: These tools provide real-time updates about crashes as they occur. This allows developers to act quickly before more users encounter the same problem.
  • Detailed crash logs: They offer comprehensive crash reports including device information, OS version, stack trace etc., helping developers identify patterns and root causes of crashes.
  • Better resource allocation: By knowing which bugs are causing the most harm to your users' experience, you can prioritize fixing them first.
  • User satisfaction: Ultimately, by reducing crashes you improve user satisfaction leading to higher ratings on Google Play Store which can directly affect your app’s success.
Example: 
Suppose there's an e-commerce app that is crashing frequently during checkout process on certain devices running Android 11. Without a crash reporting tool it would be nearly impossible for developers to know about this issue unless users report it themselves.

But with a tool like Instabug or Bugsnag integrated into their codebase, developers would get immediate notifications about these crashes along with detailed reports. They could then promptly fix these issues ensuring smooth checkout process for all users thereby improving their shopping experience.

In essence, Android Crash Reporting Tools serve as an early warning system for your apps' health allowing you to deliver a seamless user experience which is vital for any successful mobile application. Next chapter will provide comparison between various popular android crash reporting tools so stay tuned!

Chapter 3: Comparison between Various Android Crash Reporting Tools

There are numerous crash reporting tools available for Android developers. Each tool has its unique features, pros, and cons. In this chapter, we will compare some of the most popular ones - Firebase Crashlytics, Instabug, Bugsnag and Sentry.

Firebase Crashlytics

Firebase Crashlytics is a lightweight yet powerful real-time crash reporter that helps you track, prioritize, and fix stability issues that erode your app quality. It offers detailed crash reports including stack traces and device metrics. Moreover it's free to use which makes it an attractive choice for many developers.

Instabug

Instabug provides comprehensive bug and crash reports along with user feedback all in one place. It offers detailed error logs along with network request logs which can be very helpful in debugging complex issues. However unlike Firebase Crashlytics it's not free to use but they do offer a basic free plan.

Bugsnag

Bugsnag not only provides automatic android crash reporting but also proactive application health monitoring capabilities like detecting ANRs (Application Not Responding errors). It supports both native android apps as well as cross-platform apps developed using React Native or Flutter.

Sentry

Sentry provides open-source error tracking that shows you every crash in your stack as it happens with the exact line of code causing the issue along with email notifications about new crashes. Like Bugsnag it also supports various platforms besides native Android apps.

Comparison Table:

| Tool | Real-time Reporting | Detailed Error Logs | Network Request Logs | Price |
|:----:|:-------------------:|:-------------------:|:--------------------:|-------|
|Firebase Crashlytics | Yes | Yes | No  | Free |
|Instabug             | Yes | Yes | Yes  | Freemium |
|Bugsnag              | Yes | Yes 	| No 	| Paid   |
|Sentry              		| Yes		| Yes  	|| No 	        || Paid |

Note:
This comparison table is based on features offered by these tools at the time of writing this article (August 2023) and may change over time as these companies update their offerings.
 

In next chapter we will discuss how to choose the right tool for your specific needs so stay tuned!

Chapter 4: How to Choose the Right Tool for Your App

Choosing the right crash reporting tool for your Android app can be a challenging task given the plethora of options available. However, making an informed decision involves considering various factors that align with your specific needs and constraints. Here are some key factors to consider:

  • Features: Different tools offer different features. Some provide detailed crash reports, while others also include network logs or user feedback features. Make a list of features you need and choose a tool that provides those.
  • Budget: While some tools like Firebase Crashlytics are free, others have pricing plans based on usage or number of users. Determine your budget and choose accordingly.
  • Ease of integration: Check how easy it is to integrate the tool into your existing codebase. Some tools may require significant changes in code which could be time-consuming.
  • Platform support: If you're developing cross-platform apps using Flutter or React Native, make sure the tool supports these platforms.
Example: 
If you're a startup with limited budget looking for a basic crash reporting solution then Firebase Crashlytics would be an ideal choice due to its robust feature set and zero cost.

On the other hand if you're working on a large-scale e-commerce app where network request logs can help debug issues related to failed transactions then Instabug would be more suitable despite its cost.

Remember there's no one-size-fits-all solution when it comes to choosing the right Android Crash Reporting Tool. It depends on individual needs and constraints. In next chapter we will conclude our discussion on android crash reporting tools so stay tuned!

Chapter 5: Conclusion and Final Thoughts

In conclusion, Android Crash Reporting Tools are an essential part of the app development process. They help in tracking, prioritizing, and resolving crashes that can significantly impact user experience and your app's success. There are several tools available each with its unique set of features and pricing.

We compared some popular tools like Firebase Crashlytics, Instabug, Bugsnag and Sentry. While Firebase Crashlytics is a powerful yet free tool ideal for startups or individual developers on a tight budget, other paid options like Instabug or Bugsnag offer additional features like network request logs or proactive application health monitoring respectively.

Choosing the right tool depends on your specific needs and constraints such as required features, budget, ease of integration and platform support. Remember to consider these factors carefully before making a decision.

Final Thought:
Crashes are inevitable in any app but they don't have to be disastrous. With the right crash reporting tool integrated into your development process you can swiftly identify and fix crashes improving your app's stability and user satisfaction.

So choose wisely because when it comes to maintaining your app's quality every little help counts!

That concludes our discussion on Android Crash Reporting Tools. We hope this guide helps you in making an informed decision about choosing the right tool for your needs.

アンドロイド開発者のための必須ツール、クラッシュレポーティングツール比較!

第1章: Androidクラッシュレポーティングの紹介

モバイルアプリケーションの開発では、アプリの安定性と信頼性を維持することが重要です。特にAndroidアプリケーションの場合、さまざまなデバイスとオペレーティングシステムの違いにより、予期せぬクラッシュやエラーが発生する可能性があります。こうした場合には、Androidクラッシュレポーティングツールが必要です。

Androidクラッシュレポーティングツールは、開発者が自身のAndroidアプリケーションで発生するクラッシュを追跡し、解決するのに役立つソフトウェアユーティリティです。これらのツールはクラッシュが発生する直前の状況に関する詳細なレポートを提供し、デバイス情報、オペレーティングシステムのバージョン、クラッシュ発生時のスタックトレース情報を含みます。これにより、開発者はクラッシュのパターンを特定し、その原因を正確に理解して効率的に解決することができます。

Android開発者向けにはさまざまな種類のクラッシュレポーティングツールがあります。一部はアプリのコードベースに統合できるスタンドアロンのツールであり、他の一部はユーザーの参加トラッキング、ネットワークリクエストモニタリング、アプリの利用データ分析などを含むより大規模なアプリケーションパフォーマンス管理(APM)ソリューションの一部です。

どのタイプを選択するにしても、クラッシュレポーティングツールを開発プロセスに統合することで、アプリの安定性とユーザー満足度を大幅に向上させることができます。また、デバッグプロセスの多くを自動化することで、時間と労力を節約できます。

例:
Firebase Crashlyticsは、ネイティブAndroidアプリだけでなく、FlutterやReact Nativeを使用して開発されたクロスプラットフォームアプリに対してもリアルタイムのクラッシュレポーティングを提供するツールの一つです。Firebase Crashlyticsをアプリのコードベースに統合すると、開発者は発生したクラッシュに関する詳細なレポートとリアルタイムの通知を受け取ることができます。

Crashlyticsレポートには、次の情報が含まれます:
- 詳細なスタックトレース
- クラッシュが発生したスレッドがUIタスクを実行したかどうか
- ユーザーへの影響などの重要な側面を強調する全体的なサマリービュー

Firebase Crashlyticsの動作についての詳細は、以下のリンクから確認できます: Firebase公式ドキュメント。 次の章では、Firebase Crashlyticsを含むさまざまな人気のあるAndroidクラッシュレポーティングツールを比較してみましょう。続きをお楽しみに!

第2章: Android開発におけるクラッシュレポーティングツールの重要性

迅速なモバイルアプリ開発の中で、優れたユーザーエクスペリエンスを提供することが重要です。クラッシュやエラーはユーザーエクスペリエンスを妨げるだけでなく、Google Playストアでのアプリの評価とレビューにも負の影響を与えます。これによりユーザーの維持率が低下し、アプリの全体的な成功にも影響を及ぼす可能性があります。そのため、これらの問題を迅速に特定し解決することは重要であり、ここでAndroidクラッシュレポーティングツールの重要な役割が発揮されます。

Android開発におけるクラッシュレポーティングツールの重要性を説明するいくつかの主な理由は以下の通りです:

  • リアルタイムなエラートラッキング: これらのツールはクラッシュが発生するとリアルタイムで更新を提供します。これにより、多くのユーザーが同じ問題に直面する前に、開発者が迅速に対応することができます。
  • 詳細なクラッシュログ: これらはデバイス情報、オペレーティングシステムのバージョン、スタックトレースなど、包括的なクラッシュレポートを提供し、開発者がクラッシュのパターンと原因を特定するのに役立ちます。
  • リソース割り当ての最適化: どのバグが最も大きな影響を及ぼすかを特定することで、それらのバグを最初に修正することができます。
  • ユーザー満足度: クラッシュを減少させることで、ユーザー満足度が向上し、Google Playストアでの評価が向上する可能性があり、これはアプリの成功に直接影響を与えることがあります。
例:
例えば、特定のデバイスでAndroid 11を実行する際に支払いプロセス中に頻繁にクラッシュする電子商取引アプリがあるとしましょう。クラッシュレポーティングツールなしでは、ユーザーが直接問題を報告しない限り、開発者がこの問題に気付くことはほとんど不可能です。

しかし、InstabugやBugsnagなどのツールをコードベースに統合すると、開発者は即座にこれらのクラッシュの通知と詳細なレポートを受け取ることができます。これにより、開発者は問題を迅速に解決し、すべてのユーザーにスムーズな支払いプロセスを提供し、ショッピング体験を向上させることができます。

要約すると、Androidクラッシュレポーティングツールはアプリの健全性を早期に検出してスムーズなユーザーエクスペリエンスを提供するために重要な役割を果たします。成功するモバイルアプリケーションには不可欠です。次の章では、特にFirebase Crashlyticsを比較対象として、さまざまな人気のAndroidクラッシュレポーティングツールについて詳しく説明します。続きをお楽しみに!

第3章: 様々なAndroidクラッシュレポーティングツールの比較

Android開発者向けにはさまざまなクラッシュレポーティングツールがあります。各ツールには固有の機能や長所、短所があります。この章では、Firebase Crashlytics、Instabug、Bugsnag、Sentryなど、いくつかの人気ツールを比較してみましょう。

Firebase Crashlytics

Firebase Crashlyticsは軽量でありながら強力なリアルタイムのクラッシュレポートツールであり、クラッシュを追跡し、優先順位付けし、解決するのに役立ちます。スタックトレースやデバイスメトリクスを含む詳細なクラッシュレポートを提供します。また、無償提供されるため、予算の制約があるスタートアップや個人開発者にとっても魅力的な選択肢となります。

Instabug

Instabugは包括的なバグおよびクラッシュレポートとユーザーフィードバックを1つの場所で提供します。ネットワークリクエストログとともに詳細なエラーログも提供し、複雑な問題のデバッグに非常に役立つことがあります。ただし、Firebase Crashlyticsと異なり、無償で使用することはできませんが、基本的な無償プランも提供されています。

Bugsnag

Bugsnagは自動的なAndroidクラッシュレポートだけでなく、アプリケーションの健全性を積極的にモニタリングする機能、例えばANR(アプリケーションが応答しないエラー)の検出なども提供します。React NativeやFlutterを使用して開発したネイティブAndroidアプリだけでなく、クロスプラットフォームアプリもサポートしています。

Sentry

Sentryはオープンソースのエラートラッキングツールであり、コードの正確な位置とともにスタックトレース上のすべてのクラッシュをリアルタイムで表示します。 新しいクラッシュに対するメール通知も含まれています。Bugsnagと同様に、ネイティブAndroidアプリだけでなく、さまざまなプラットフォームをサポートしています。

比較表:

| ツール                | リアルタイムレポート | 詳細なエラーログ | ネットワークリクエストログ | 価格   |
|:-------------------:|:-------------:|:---------------:|:----------------:|-------|
| Firebase Crashlytics | あり          | あり            | なし              | 無償   |
| Instabug             | あり          | あり            | あり              | 無償および有償 |
| Bugsnag              | あり          | あり            | なし              | 有償   |
| Sentry               | あり          | あり            | なし              | 有償   |

注意:
この比較表は、記事作成時(2023年8月)の時点でこれらのツールが提供する機能に基づいて作成されており、これらの企業が提供を更新する場合、時間の経過とともに変更される可能性があります。

次の章では、特にアプリに適した適切なクラッシュレポーティングツールを選択する方法について議論します。引き続きお楽しみに!

第4章: アプリに適した適切なツールを選択する方法

Androidアプリに適した適切なクラッシュレポーティングツールを選択することは、さまざまな選択肢があるため、難しい作業かもしれません。ただし、情報を十分に考慮して決定することは、特定の要件や制約と一致するさまざまな要因を考慮することを意味します。以下は考慮すべき主要な要因です:

  • 機能: 各ツールは異なる機能を提供しています。一部のツールは詳細なクラッシュレポートを提供しますが、他のツールはネットワークログやユーザーフィードバックの機能も提供するかもしれません。必要な機能のリストを作成し、それを提供するツールを選択します。
  • 予算: Firebase Crashlyticsなどの一部のツールは無償ですが、他のツールは使用量やユーザー数に応じて価格が設定されることがあります。予算を決定し、それに合わせて選択します。
  • 統合の容易性: ツールを既存のコードベースに統合する際の容易さを確認します。一部のツールはコードにかなりの変更が必要な場合があり、時間がかかる場合があります。
  • プラットフォームのサポート: React NativeやFlutterを使用して開発したクロスプラットフォームアプリを含む、それらのプラットフォームをサポートしているかどうかを確認します。
例:
予算が限られているスタートアップが基本的なクラッシュレポートソリューションを探している場合、Firebase Crashlyticsは堅牢な機能を提供し、コストがかからないため優れた選択肢です。

一方、企業の規模が大きく、エラートラッキングだけでなくユーザーフィードバックの収集も重要な場合、Instabugがより包括的なソリューションを提供する可能性があります。

アプリが特定のデバイスでの特定の問題に直面している場合、Bugsnagのようなツールはその問題の特定と解決に役立つかもしれません。

最終的な選択肢は、アプリのニーズや要件、プロジェクトの予算、開発環境などによって異なります。複数のツールを試し、実際の使用体験を元に判断することをお勧めします。次の章では、本稿の要点をまとめて締めくくります。お楽しみに!

第5章: 結論とまとめ

Androidアプリの成功は、高い品質とユーザーエクスペリエンスの提供にかかっています。クラッシュやエラーはユーザーの満足度を損なうだけでなく、アプリの評価にも悪影響を与える可能性があります。ここで、Androidクラッシュレポーティングツールの重要性が浮き彫りになります。

クラッシュレポーティングツールは、アプリ開発者がアプリ内で発生するクラッシュやエラーを追跡し、効率的に解決するのに役立ちます。Firebase Crashlytics、Instabug、Bugsnag、Sentryなど、さまざまなツールがありますが、アプリのニーズに合った適切なツールを選択することが重要です。

アプリに適したツールを選択する際には、ツールの機能、予算、統合の容易さ、プラットフォームのサポートなど、複数の要因を考慮することが重要です。複数のツールを試してみて、実際の使用体験を元に最終的な判断を下すことをお勧めします。

クラッシュレポーティングツールの選択と統合は、アプリの安定性と品質を向上させ、ユーザーエクスペリエンスを向上させるための重要なステップです。開発者はこれらのツールを活用して、優れたAndroidアプリを提供し、ユーザーの期待に応えることが求められています。

本稿を読んでいただき、ありがとうございました。これからも素晴らしいアプリ開発をお祈りしています。ご質問や情報の共有があれば、お気軽にお知らせください!